In one of the previous blog we looked at setting up K8S on a laptop. The advantages of this setup is the freedom to try out of different things and it is very quick to get started. On my laptop it takes about 5 minutes for the Virtual Machines to start including the K8S in them. The downside is it's mainly for learning things and doesn't take much load.
Recently I bought a new Lenovo ThinkPad and so had to go with the entire exercise of setting up K8S on it. BTW, pretty happy with the Laptop. The only gripe is that it comes with 8GB of RAM, need to upgrade it to 16GB, the maximum RAM it supports. The Laptop is very light and I can snug into any corner of the house to work with concentration easily.

Above is the setup on my previous Laptop, with one Control Plane (master) and two slaves. There had been a few problems with the VirtualBox networking. Different types of networking are supported by VirtualBox (1) and Bridged Networking was used. With Bridged Networking everything was working fine with the below problems.
- Had to be always connected to the network. Won't be able to work in the offline mode.
- Also, switching between the different networks will change the IP of the master and K8S would stop working.

Here(1) is a good article on the different types of networking in VirtualBox and details about them. On the Y-Axis we have the different types of networking and on the X-Axis the features they support. Let's narrow down to the type of networking we would like to use with VirtualBox by identifying the required features for having a K8S Cluster on the Laptop.

-- "VM <--> VM" -- Required for communicating across VM instances.
-- "VM <- Host" -- Required as we need to connect from the Host OS to the Guest for debugging etc.
-- "VM --> LAN" -- Required for the internet connection to download the different softwares
-- "VM --> Host" -- Is optional for connecting from the Virtual Machine to Host
-- "VM <-- LAN" -- Is optional for accessing the K8S Cluster from outside the Laptop
From the feature matrix and the required features, the only options left around the VirtualBox networking are NAT Network and Bridged Networking. The problem with the Bridged networking is that as mentioned above, it always requires connection to the network and switching to a different network changes the IP of the K8S master and breaks down the entire setup. The certificates during the K8S setup are tied to a specific IP and need to generated again each time the IP address of the master changes (1). This is not impossible, but is tedious every time we change the network and the IP address of the master changes. So, the only optimal option left is to use the NAT Network.
With the combination of the NAT Network in VirtualBox and using static IP address in guest Virtual Machines, we don't need to worry about changing from one network to another as the VirtualBox NAT Network has a DHCP component and an IP address from it can be configured as Static IP for the Guest Virtual Machines. Also, a Virtual Switch would be used for the communication across the different guest Virtual Machines and there is no need to be connected to the network. This ensures that we can work in the offline mode with K8S on the laptop even we are on the move. Below are the different components while using the VirtualBox NAT Network and how the network communication happens. Highlighted in the red is how the network communication happens.

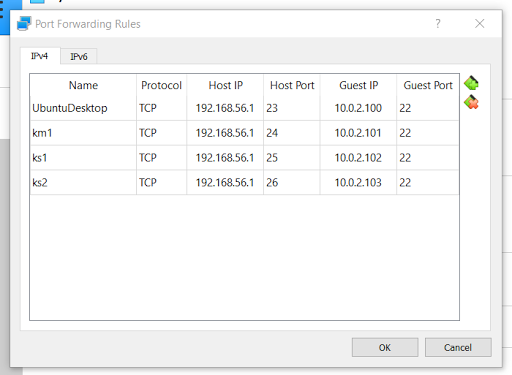
The only catch with the NAT Network is that we won't be able to connect to the guest Virtual Machines directly without doing any port forwarding as mentioned in the VirtualBox documentation here (1). The documentation mentions NAT, but the same applies to the NAT Network also. This is a not a big issue, but is a matter of configuring the VirtualBox with "Port Forwarding Rules" before connecting to the guest Virtual Machines.
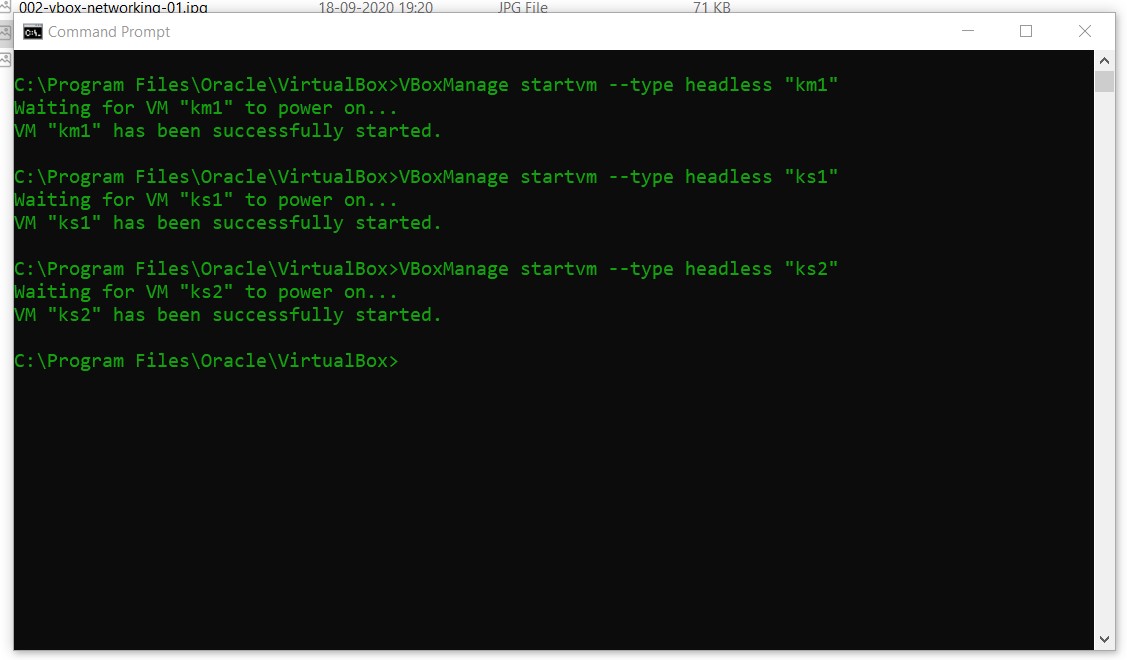
In a future blog, I will provide the binaries and the steps to easily setup K8S on a laptop. But, for now I took a screenshot of the Memory usage before and after starting the Virtual Machines on the laptop.
(Before)

(Starting the Virtual Machines with K8S)
(After)

(Laptop CPU and RAM)

Conclusion
To conclude setting up K8S is not a hard task, but requires a bit of patience for the installation of the OS, softwares, configurations and finally cloning the Virtual Machines, so as to avoid repetition of tasks and saving time. Also "VirtualBox NAT Network" is the best option in the network type as this enables to work in the offline mode and doesn't break the K8S setup while switching between networks.
As mentioned I would be uploading the Virtual Machines Images and would be detailing the procedure for setting up K8S on a Laptop. But, I need to zip and uploads huge files, so it might take some time.
No comments:
Post a Comment