Monday, October 31, 2016

Maximum temperature for year using Spark SQL

In the previous blog, we looked at how find out the maximum temperature of each year from the weather dataset. Below is the code for the same using Spark SQL which is a layer on top of Spark. SQL on Spark was supported using Shark which is being replaced by Spark SQL. Here is a nice blog from DataBricks on the future of SQL on Spark.
import re
import sys

from pyspark import SparkContext
from pyspark.sql import SQLContext, Row

#function to extract the data from the line
#based on position and filter out the invalid records
def extractData(line):
    val = line.strip()
    (year, temp, q) = (val[15:19], val[87:92], val[92:93])
    if (temp != "+9999" and re.match("[01459]", q)):
        return [(year, temp)]
    else:
        return []

logFile = "hdfs://localhost:9000/user/bigdatavm/input"

#Create Spark Context and SQL Context with the master details and the application name
sc = SparkContext("spark://bigdata-vm:7077", "max_temperature")
sqlContext = SQLContext(sc)

#Create an RDD from the input data in HDFS
weatherData = sc.textFile(logFile)

#Transform the data to extract/filter and then map it to a row
temperature_data = weatherData.flatMap(extractData).map(lambda p: Row(year=p[0], temperature=int(p[1])))

#Infer the schema, and register the SchemaRDD as a table.
temperature_data = sqlContext.inferSchema(temperature_data)
temperature_data.registerTempTable("temperature_data")

#SQL can be run over SchemaRDDs that have been registered as a table.
#Filtering can be done in the SQL using a where clause or in a py function as done in the extractData()
max_temperature_per_year = sqlContext.sql("SELECT year, MAX(temperature) FROM temperature_data GROUP BY year")

#Save the RDD back into HDFS
max_temperature_per_year.saveAsTextFile("hdfs://localhost:9000/user/bigdatavm/output")
Thursday, October 27, 2016

Maximum temperature for year using Spark/Python

Hadoop – The Definitive Guide revolves around the example of finding the maximum temperature for a particular year from the weather data set. The code for the same is here and the data here. Below is the Spark code implemented in Python for the same.
import re
import sys

from pyspark import SparkContext

#function to extract the data from the line
#based on position and filter out the invalid records
def extractData(line):
    val = line.strip()
    (year, temp, q) = (val[15:19], val[87:92], val[92:93])
    if (temp != "+9999" and re.match("[01459]", q)):
        return [(year, temp)]
    else:
        return []

logFile = "hdfs://localhost:9000/user/bigdatavm/input"

#Create Spark Context with the master details and the application name
sc = SparkContext("spark://bigdata-vm:7077", "max_temperature")

#Create an RDD from the input data in HDFS
weatherData = sc.textFile(logFile)

#Transform the data to extract/filter and then find the max temperature
max_temperature_per_year = weatherData.flatMap(extractData).reduceByKey(lambda a,b : a if int(a) > int(b) else b)

#Save the RDD back into HDFS
max_temperature_per_year.saveAsTextFile("hdfs://localhost:9000/user/bigdatavm/output")
The map function during the transformation is similar to the map function in the MR model and reduceByKey transformation is similar to the reduce function in the MR model.

In the future blogs, we will see how to perform complex processing using the other transformations and actions provided by Spark.

Monday, October 24, 2016

Hadoop/MR vs Spark/RDD WordCount program

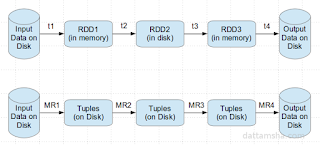
Apache Spark provides an efficient way for solving iterative algorithms by keeping the intermediate data in the memory. This avoids the overhead of R/W of the intermediate data from the disk as in the case of MR.

Also, when running the same operation again and again, data can be cached/fetched from the memory without performing the same operation again. MR is stateless, lets say a program/application in MR has been executed 10 times, then the whole data set has to be scanned 10 times.
Also, namesake MR supports only Map and Reduce operations and everything (join, groupby etc) has to be fit into the Map and Reduce model, which might not be the efficient way. Spark supports a couple of other transformations and actions besides just Map and Reduce as mentioned here and here.

Spark code is also compact when compared to the MR code. Below is the program for performing the WordCount using Python in Spark.
from pyspark import SparkContext

logFile = "hdfs://localhost:9000/user/bigdatavm/input"

sc = SparkContext("spark://bigdata-vm:7077", "WordCount")

textFile = sc.textFile(logFile)

wordCounts = textFile.flatMap(lambda line: line.split()).map(lambda word: (word, 1)).reduceByKey(lambda a, b: a+b)

wordCounts.saveAsTextFile("hdfs://localhost:9000/user/bigdatavm/output")
and the same in MR model using Hadoop is a bit verbose as shown below.
package org.apache.hadoop.examples;

import java.io.IOException;
import java.util.StringTokenizer;

import org.apache.hadoop.conf.Configuration;
import org.apache.hadoop.fs.Path;
import org.apache.hadoop.io.IntWritable;
import org.apache.hadoop.io.Text;
import org.apache.hadoop.mapreduce.Job;
import org.apache.hadoop.mapreduce.Mapper;
import org.apache.hadoop.mapreduce.Reducer;
import org.apache.hadoop.mapreduce.lib.input.FileInputFormat;
import org.apache.hadoop.mapreduce.lib.input.FileSplit;
import org.apache.hadoop.mapreduce.lib.output.FileOutputFormat;
import org.apache.hadoop.util.GenericOptionsParser;

public class WordCount {

    public static class TokenizerMapper extends
        Mapper<Object, Text, Text, IntWritable> {

        private final static IntWritable one = new IntWritable(1);
        private Text word = new Text();

        public void map(Object key, Text value, Context context)
            throws IOException, InterruptedException {
            StringTokenizer itr = new StringTokenizer(value.toString());
            while (itr.hasMoreTokens()) {
                word.set(itr.nextToken());
                context.write(word, one);
            }
        }
    }

    public static class IntSumReducer extends
        Reducer<Text, IntWritable, Text, IntWritable> {

        private IntWritable result = new IntWritable();

        public void reduce(Text key, Iterable<Intwritable> values,
        Context context) throws IOException, InterruptedException {
            int sum = 0;
            for (IntWritable val : values) {
                sum += val.get();
            }
            result.set(sum);
            context.write(key, result);
        }
    }

    public static void main(String[] args) throws Exception {
        Configuration conf = new Configuration();
        String[] otherArgs = new GenericOptionsParser(conf, args)
            .getRemainingArgs();

        Job job = new Job(conf, "word count");

        job.setJarByClass(WordCount.class);

        job.setMapperClass(TokenizerMapper.class);
        job.setCombinerClass(IntSumReducer.class);
        job.setReducerClass(IntSumReducer.class);

        job.setOutputKeyClass(Text.class);
        job.setOutputValueClass(IntWritable.class);

        FileInputFormat.addInputPath(job, new Path(otherArgs[0]));
        FileOutputFormat.setOutputPath(job, new Path(otherArgs[1]));

        System.exit(job.waitForCompletion(true) ? 0 : 1);
    }
}
Here we looked into WordCount which is similar to HelloWorld program in terms of simplicity, for one to get started with a new concept/technology/language. In the future blogs, we will look into a little more advanced features in Spark.

Thursday, October 20, 2016

Intersection of Big Data and IOT

Lately I had been blogging about IOT and Big Data. They go hand-in-hand. With the IOT devices feeding the data to the Big Data platforms on the Cloud to store/analyze the data and feed it back to the IOT devices. One such example is the Nest device bought by Google. Nest thermostat gathers the room temperature, sends it over to the Cloud over Wi-Fi, analytics done in the Cloud and fed back to the Nest again.

This is not something new, but had been there for quite some time. But, the conditions are moving towards more adoption of Big Data and IOT like cheap sensors, Cloud, cheaper and faster internet connections. Here is an article  from ZDNet on ten practical examples on the intersection of Big Data and IOT. For those who are interested in learning more, here (1, 2) are few more references from ZDNet.

I am yet to try it out, but here is a detailed article from IBM Developer Works on building a temperature sensor using Arduino Uno, putting the data in the Cloud and finally visualizing the data in a real time. Here is another article on how to integrate IOT with Azure.


Monday, October 17, 2016

Getting started with Apache Spark

With so much noise around Apache Spark, let's look into how to get started with Spark in local mode and execute a simple Scala program. A lot of complex combinations are possible, but we will look at the minimum steps required to get started with Spark.

Most of the Big Data softwares are developed with Linux as the platform and porting to Windows has been an after thought. It is interesting to see how Big Data on Windows will morph in the future. Spark can run on both Windows/Linux, but we will take Linux (Ubuntu 14.04 64-bit Desktop) into consideration. So, here are the steps:

1) Download and install Oracle VirtualBox as mentioned here.

2) Download and install Ubuntu as mentioned here as a guest OS.

3) Update the patches on Ubuntu from a terminal and reboot it.
sudo apt update;sudo apt-get dist-upgrade
4) Oracle Java doesn't come with Linux distributions, so has to be installed manually on top of Ubuntu as mentioned here.

5) Spark has been developed in Scala, so we need install Scala.
sudo apt-get install scala
6) Download Spark from here and extract it. Spark built with hadoop 1x or 2x will work, because HDFS is not being used in this context.

7) From the Spark installation folder start the Spark shell.
bin/spark-shell
8) Execute the below commands in the shell to load the README.md and count the number of lines in it.
val textFile = sc.textFile("README.md")

textFile.count()
What we have done is install Ubuntu as a guest OS and then install Spark on it. And finally run a simple Scala program in Spark local mode. There are much more advanced setups like running Spark program against data in HDFS, running Spark in stand alone, Mesos and YARN mode. We will look at them in the future blogs.

Wednesday, October 12, 2016

ASF (Apache Software Foundation) as a standards body

What is ASF all about?

For many Apache is synonymous to the Apache HTTP server, which is the backbone for serving the web pages. But, there is much more to Apache. It's a non profit organization (ASF - Apache Software Foundation) which provides an environment and a platform in which different companies and individuals work in an open and collaborative fashion towards a common goal of developing a good piece of software. Open means that all the work (architecture, design, coding, testing, documentation etc) happens in an open way and there are no secrets. Anyone can also download the code, make some changes, compile it and push it back.

It's possible for different companies and individuals like you and me to improve the code and contribute it back to the ASF. To maintain the quality of the software there is a process in place where the project committer will check the quality of the code contributed by someone and then add them to the code repository. The advantage of working in this model is that any improvements made by an individual or a company can be immediately absorbed by someone else. This is what working in a collaborative fashion means.

There are a lot of Big Data projects under the ASF like Hadoop, Hive, Pig, HBase, Cassandra and a lot of non Big Data projects like Tomcat, Log4J, Velocity, Struts. The projects usually start with Incubator status and then some of them move to the TLP status (Top Level Project). The code for the different projects can be accessed in a read only way from here.


How is Apache promoting standards?

OK, now we know how the Apache process works. The different companies and individuals work towards the common goal of creating good software. Now, lets look into why standards are important in software and how Apache is promoting the standards.

Those who travel internationally and carry at least one electronic item, face the problem with the different socket layout and the voltages in different countries. The plugs just don't fit in into the sockets and so is the need to carry multiple adapters. If there had been an international standard for the socket layout and the voltage, we wouldn't face this problem.

The same can be applied to software standards also. Software standards allow interoperability across different software stacks. As an example, a program written against one software can be easily ported to some other software if the standards are followed. One example is the JEE standards. An EJB written for JBoss can be easily ported to WebSphere with minimal or no changes.

In the case of Big Data stacks, the different Big Data companies take the software from the Apache Software foundation and improve on it. Some of the improvements can be better documentation,  better performance, bug fixes, better usability in terms of installation/monitoring/alerting.

The Apache code is the common base for the different Big Data distributions. Due to this reason the Apache code base and the different distributions like HDP, CDH etc provide more or less the same API to program against. This way Apache is acting as a standards body. For example a MapReduce program written against HDP distribution can be run against the other distributions with minimal or no changes.

Although Apache is not a standards body, it is still acting as one. Usually, a standards body is formed and they do develop standards and a reference implementation for the same. This is a painstaking process and some of the standards may not see the light of the day also. The advantage of working in the Apache fashion is that the standards are developed indirectly in a very quick fashion.

Monday, October 10, 2016

What is Dockers all about?

There had been a lot of noise about Docker. And there had been a raft of announcements (1, 2, 3) about the support for Docker in their products from different  companies. In this blog, we will look what Docker is all about, but before that we will look into what virtualization, LXC. In fact, Docker-Big Data integration also can be done.

What is Virtualization?

Virtualization allows to run multiple operating systems on a single machine. For this to happen virtualization software like Xen, KVM, HyperV, VMWare vSphere, VirtualBox has to be installed. Oracle VirtualBox is free and easy to setup. Once VirtualBox has been installed, multiple guest OS can be run on top of VirtualBox as shown below.
On top of the guest OS, applications can be installed. The main advantage of the above configuration is that the applications are isolated from each other. And also, resources can be allocated to the guest OS and a single application can’t dominate and use the underlying hardware resources completely and let the other applications starve for resources. The main disadvantage is each of the guest OS gets it’s own kernel and the file system and hence consume a lot of resources.

What is LXC?

LXC (Linux Containers) provide OS level virtualization and don’t need a complete OS to be installed as mentioned in the case of virtualization.
The main advantage of LXC is that they are light weight and there is little over head of running the applications on top of LXC instead of directly on top of the host OS. And also, LXC provides isolation between the different applications deployed in them and resources can also be allocated them.

LXC can be thought of light weight machines which consume less resources, are easy to start and on which applications can be deployed.

How does Docker fit into the entire thing?

LXCs are all interesting, but it’s not that easy to migrate an application on top of LXC from one environment to another (let’s say from development to QA to production) as there are a lot of dependencies between the application and the the underlying system.

Docker provides a platform, so that applications can be be built and packaged in a standardized way. The application built, will also include all the dependencies and so there is less friction moving from one environment to another environment. Also, Docker will try to abstract the resources required for the application, so that that application can run in different environments without any changes.

For those from a Java/JEE background, Docker applications can be considered similar to an EAR file which can be migrated from one environment to another without any changes as long as the proper standards are followed while creating the EAR file. The Java applications can make JNDI calls to discover services by name and so are not tied to a particular resource.

BTW, here is a nice documentation on Docker.

Saturday, October 8, 2016

Consolidating the blogs

I have a few other web sites onlyubuntu.com (around Ubuntu) and dattamsha.com (around Big Data, IOT and related technologies) besides the current one. Over time it has become difficult to maintain multiple sites and also I had not been updating the other sites on a regular basis.

So, I decided to consolidate the sites to thecloudavenue.com (the current site). In this process, I would be moving the blogs from the other sites to this this site in a phase vise manner.

Happy reading !!!!

Snap Circuits Jr. from Elenco for kids

Lately I had been my hands-on with the RaspberryPi and Arduino prototype kits to get started with IOT (Internet Of Things). Being a graduate in Electrical and Electronics Engineering helped me in getting started quickly.

I built a car with 4 DC motors, control it using a TV remote control which emits IR (Infra Red) signal. The IR signal was captured by the IR sensor on the car. Based on the button pressed on the remote control an Arduino program controlled the speed of the motors. This made the car move in different directions. It was not too complicated, but was fun to build.

All the time I was building the car, my son used to tag with me asking questions on what the different parts were and how they function. To continue his interest in the same, I bought him a Snap Circuits Jr. SC-100 and he was more than happy to do different circuits with it. The Snap Circuits comes with different models like Snap Circuits SC-300, Snap Circuits PRO SC-500 and finally the Snap Circuits Extreme SC-750. The Snap Circuits can be upgraded easily. There is a Snap Circuits UC-30 Upgrade Kit SC-100 to SC-300 and others.

The Snap Circuits are a big rugged and don't get damaged very easily, the only thing which needs to be taken care is the polarity of the components when connecting. There is no need to solder, the different components snap with each other using the push buttons. Batteries are the only items which need to be bought separately. It comes with a manual/guide explaining the different components, trouble shooting tips, circuit diagrams etc which is really nice.

As the name says, connecting them is a snap and fun. Would very much recommend for those who want to get their kids started with electronics.

Saturday, October 1, 2016

Comparing ORC vs Parquet Data Storage Formats using Hive

CSV is the most familiar way of storing the data. In this blog I will try to compare the performance aspects of the ORC and the Parquet formats. There is a lot of literature on what these are, so less focus on the same.

Similar to Parquet for storing the data in the column oriented format there is another format called ORC. Parquet had been aggressively promoted by Cloudera and ORC by Hortonworks. Here are some articles (1, 2) on Parquet vs ORC.

The CSV data can be converted into ORC and Parquet formats using Hive. These are the steps involved. The same steps are applicable to ORC also. Simply, replace Parquet with ORC. Behind the scenes a MapReduce job will be run which will convert the CSV to the appropriate format.

- Create a Hive table (ontime)
- Map the ontime table to the CSV data
- Create a Hive table ontime_parquet and specify the format as Parquet
- Move the table from the ontime table to the ontime_parquet table

In the previous blog, we have seen how to convert CSV into Parquet using Hive. The procedure is more or less for ORC, just replace the `STORED AS PARQUET` to `STORED AS ORC` in the table definition as shown below and also specify the compressions codec to use.
create external table ontime_orc_snappy (
  Year INT,
  Month INT,
  DayofMonth INT,
  DayOfWeek INT,
  DepTime  INT,
  CRSDepTime INT,
  ArrTime INT,
  CRSArrTime INT,
  UniqueCarrier STRING,
  FlightNum INT,
  TailNum STRING,
  ActualElapsedTime INT,
  CRSElapsedTime INT,
  AirTime INT,
  ArrDelay INT,
  DepDelay INT,
  Origin STRING,
  Dest STRING,
  Distance INT,
  TaxiIn INT,
  TaxiOut INT,
  Cancelled INT,
  CancellationCode STRING,
  Diverted STRING,
  CarrierDelay INT,
  WeatherDelay INT,
  NASDelay INT,
  SecurityDelay INT,
  LateAircraftDelay INT
) STORED AS PARQUET LOCATION '/user/bigdata/airline/input-orc-snappy-from-hive' TBLPROPERTIES ("orc.compress"="SNAPPY");
Then the data has to be moved from the regular Hive table (ontime) to the ontime_orc_snappy using the below command.
INSERT OVERWRITE TABLE ontime_parquet_gzip SELECT * FROM ontime;
The property name for the and the default properties are mentioned in the below table. When not using the default compression codec then the property can be set on the table using the TBLPROPERTIES as shown in the above table creation command. Note that ZLIB in ORC and GZIP in Parquet uses the same compression codec, just the property name is different.


Four tables need to be created in Hive for the combination of orc/parquet and snappy/zlib/gzip compression as shown below.


Now that the tables have been created, the data can be moved from the ontime table to the remaining four tables. Four folders in HDFS will be created as shown below.


One the four tables I ran two queries on all the four tables. The first query was of type aggregation to find the number of delayed flights per origin as shown below.
select Origin, count(*) from ontime_parquet_gzip where DepTime > CRSDepTime group by Origin;
The second query is to fetch all the columns in a single row as shown below.
select * from ontime_parquet_gzip where origin = 'LNY' and AirTime = 16;
Below is the comparison matrix which is of main interest.


Here are a few things which I want to highlight

- There is not much of storage savings when using using ORC and Parquet when using the same compression code like `SNAPPY vs SNAPPY` and `ZLIB vs GZIP`.

- The time for converting from CSV to ORC and Parquet format is very close, not much difference considering the total time it takes for the conversion.

- Hortonworks blog says that the ORC format provides much better compression ratio when compared to Parquet. This is a bit misleading as the default properties are being used, ZLIB for ORC and SNAPPY for Parquet. By making sure that both the formats use the compression codec, there is not much significant difference in the compression ratio as shown in the above matrix. So, it would be better to focus on the features.

- For aggregation queries like `time for the the delayed flights` there is not such a drastic difference. Both the ORC and Parquet formats perform considerably well when compared to the CSV format.

- While fetching all the columns for a single now using a condition like "where origin = 'LNY' and AirTime = 16;", ORC has an edge over Parquet because the ORC format has a light index along with each file. By using the indexes in ORC, the underlying MapRedeuce or Spark can avoid reading the entire block.

- The indexing in Parquet seems to be a good differentiator. Although the ORC has to create Index while creating the files, there is not significant difference for the conversion and also the size of the files for both the formats.

- The different Big Data vendors try to promote their own format without worrying much about the interoperability. The Cloudera Certification has topics about Parquet, while the Hortonworks Certifications has topics around ORC.

This has been a lengthy blog than I expected, so bye for now and see you soon.

Converting csv to Parquet using Spark Dataframes

In the previous blog, we looked at on converting the CSV format into Parquet format using Hive. It was a matter of creating a regular table, map it to the CSV data and finally move the data from the regular table to the Parquet table using the Insert Overwrite syntax. In this blog we will look at how to do the same thing with Spark using the dataframes feature.
from pyspark import SparkConf
from pyspark import SparkContext
from pyspark.sql import SQLContext

conf = SparkConf().setMaster("spark://bigdata-server:7077")
sc = SparkContext(conf=conf, appName="flightDataAnalysis")
sqlContext = SQLContext(sc)

#converts a line into tuple
def airlineTuple(line):
    values = line.split(",")

    return (
    values[0], values[1], values[2], values[3], values[4], values[5], values[6], values[7], values[8], values[9],
    values[10], values[11], values[12], values[13], values[14], values[15], values[16], values[17], values[18], values[19],
    values[20], values[21], values[22], values[23], values[24], values[25], values[26], values[27], values[28])

#load the airline data and covert into an RDD of tuples
lines = sc.textFile("hdfs://localhost:9000/user/bigdata/airline/input").map(airlineTuple)

#convert the rdd into a dataframe
df = sqlContext.createDataFrame(lines, ['Year', 'Month', 'DayofMonth', 'DayOfWeek', 'DepTime', 'CRSDepTime', 'ArrTime',
                                        'CRSArrTime', 'UniqueCarrier', 'FlightNum', 'TailNum', 'ActualElapsedTime',
                                        'CRSElapsedTime', 'AirTime', 'ArrDelay', 'DepDelay', 'Origin', 'Dest',
                                        'Distance', 'TaxiIn', 'TaxiOut', 'Cancelled', 'CancellationCode', 'Diverted',
                                        'CarrierDelay', 'WeatherDelay', 'NASDelay', 'SecurityDelay',
                                        'LateAircraftDelay'])

#save the dataframe as a parquet file in HDFS
df.write.parquet("hdfs://localhost:9000/user/bigdata/airline/input-parquet-spark")
Spark took a bit more time to convert the CSV into Parquet files, but Parquet files created by Spark were a bit more compressed when compared to Hive. This is because Spark uses gzip and Hive uses snappy for Parquet compression. The spark.sql.parquet.compression.codec property can be used to change the Spark parquet compression codec.


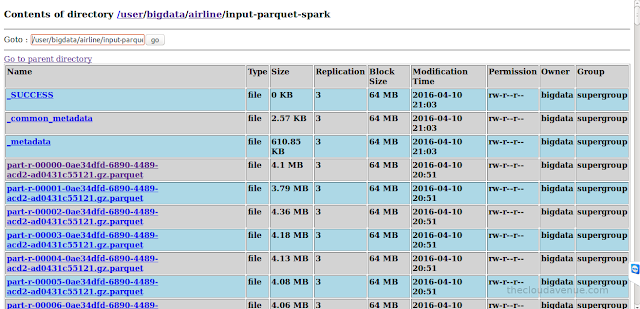
As seen in the below HDFS console, the number of Parquet files created by Spark were more than the number of files created by Hive and also smaller is size. This is not really efficient as HDFS has not be created to store smaller files. Here is an article from Cloudera on the same. Spark converted each block into a separate file in Parquet, but Hive combined multiple blocks into a single Parquet file. These are pros and cons of the way Hive and Spark have created the Parquet files which would be discussed in an upcoming blog.


Below is the comparison of the time taken and the size for both Hive and Spark. Note that these are got by using the out of the box setting with Hive and Spark and can be further fine tuned. The difference is the size if the default compression codes set in Hive and Spark.