Wednesday, April 24, 2013

Bulk loading data in HBase

HBase's Put API can be used to insert the data into HDFS, but the data has to go through the complete HBase path as explained here. So, for inserting the data in bulk into HBase using the Put API is lot slower than the bulk loading option. There are some references to bulk loading (1, 2), but either they are incomplete or a bit too complicated.

For bulk loading of the data into HBase here are steps involved

1) Create a project in Eclipse with Driver.java, HBaseKVMapper.java and the HColumnEnum.java programs. These files contain the java MapReduce code for converting the input data into the HFile format.

2) Include the below libraries in the lib folder. The libraries except for joda* and openscv* are part of the the HBase installation.
commons-configuration-1.6.jar, commons-httpclient-3.1.jar, commons-lang-2.5.jar, commons-logging-1.1.1.jar, guava-11.0.2.jar, hadoop-core-1.0.4.jar, hbase-0.94.5.jar, jackson-core-asl-1.8.8.jar, jackson-mapper-asl-1.8.8.jar, joda-time-2.2.jar, log4j-1.2.16.jar, opencsv-2.3.jar, protobuf-java-2.4.0a.jar, slf4j-api-1.4.3.jar, slf4j-log4j12-1.4.3.jar, zookeeper-3.4.5.jar
3) Make sure that the above mentioned java programs compile properly without any errors in Eclipse. Now export the project as a jar file.

4) Start HDFS, MapReduce, HBase daemons and make sure they are running properly.

5) Download the input csv data (RowFeeder.csv) and put it in into HDFS.
bin/hadoop fs -mkdir input/
bin/hadoop fs -put /home/training/WorkSpace/BigData/HBase-BulkImport/input/RowFeeder.csv input/RowFeeder.csv
6) Start the HBase shell and create and alter the table
create 'NBAFinal2010', {NAME => 'srv'}, {SPLITS => ['0000', '0900', '1800', '2700', '3600']} 
disable 'NBAFinal2010' 
alter 'NBAFinal2010', {METHOD => 'table_att', MAX_FILESIZE => '10737418240'} 
enable 'NBAFinal2010'
7) Add the following to the conf/hadoop-env.sh file. This enables the Hadoop client to connect to HBase and get the number of splits.
export HADOOP_CLASSPATH=/home/training/Installations/hbase-0.94.5/lib/guava-11.0.2.jar:/home/training/Installations/hbase-0.94.5/lib/zookeeper-3.4.5.jar:/home/training/Installations/hbase-0.94.5/lib/protobuf-java-2.4.0a.jar
8) Run the MapReduce job as below to generate the HFiles. The first parameter is the input folder where the csv file is present, then the output folder where the HFiles will be created and the final argument is the table name.
bin/hadoop jar /home/training/Desktop/HBase-BulkImport.jar com.cloudera.examples.hbase.bulkimport.Driver input/ output/ NBAFinal2010
9) The HFiles should be created in HDFS in the output folder. The number of HFiles maps to the number of splits in the NBAFinal2010 table.

10) Once the HFiles are created in HDFS, the files can be linked to the NBAFinal2010 using the below command. The first argument is the location of the HFile and the final parameter is the table name.
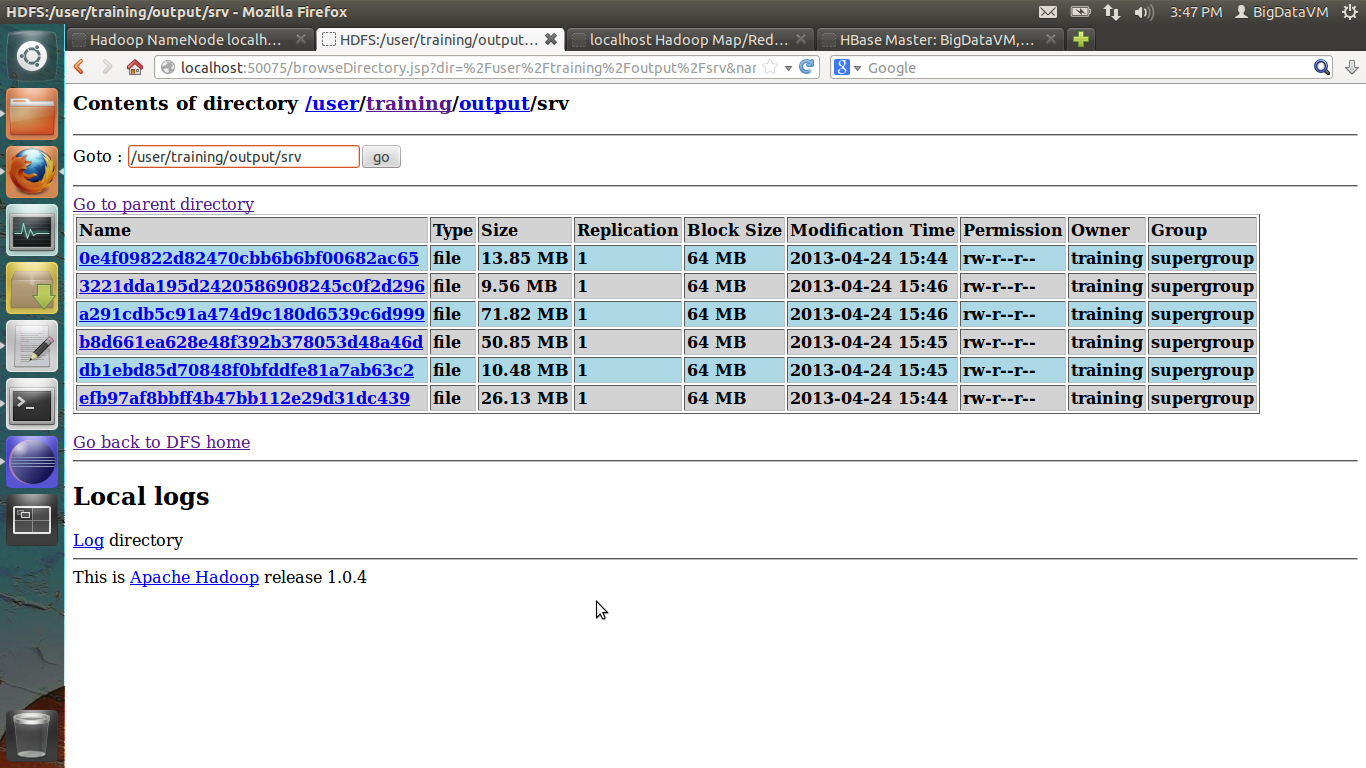
bin/hadoop jar /home/training/Installations/hbase-0.94.5/hbase-0.94.5.jar completebulkload /user/training/output/ NBAFinal2010
The above command will automatically update the -ROOT- and the .META. system tables in HBase and should just take a couple of seconds to complete.

11) Run count 'NBAFinal2010' in HBase and verify that the data has been inserted into HBase.

Note (1st October, 2013) :  Here is a detailed blog from Cloudera on the same.

Monday, April 15, 2013

Getting the filename of the input block in Hadoop

Hadoop by default splits the input file into 64MB blocks and each block will be processed by a mapper task. For gathering the metrics across each file and not the entire set of files, it's required to get the file name within the mapper. Here is how to extract the file name of the split being processed using the old and the new MR API.

Using the old MR API

Add the below to the mapper class.
String fileName = new String();
public void configure(JobConf job)
{
   filename = job.get("map.input.file");
}

Using the new MR API

Add the below to the mapper class.
String fileName = new String();
protected void setup(Context context) throws java.io.IOException, java.lang.InterruptedException
{
   fileName = ((FileSplit) context.getInputSplit()).getPath().toString();

}
Now the String fileName can be used in the mapper code.

Friday, April 5, 2013

Setting up a CDH cluster on Amazon EC2 in less than 20 minutes

Cloud services either from Amazon, Google, RackSpace or in fact from any other vendor allows to get access to infrastructure easily and quickly without much of CAPEX or OPEX costs. Recently, there was an nice blog from Cloudera on setting up a CDH cluster on Amazon EC2. Amazon provides a lot of cloud services, of which EC2 provides elastic compute in the cloud. We would be using AWS EC2 to setup a CDH cluster.

Although the Cloudera blog is easy to follow, there were very few screen shots which makes it for those who are getting started with AWS a bit hesitant to start with. So, this blog is more about adding more details to the Cloudera blog.

Actual setting up of the cluster on EC2 takes less than 20 minutes. It took me an hour or so because of doing it for the first time. Also, the cluster can be created from any OS and I have tried from a Ubuntu 12.04 machine.

The first step is to register for AWS here, it requires a credit card and some other details. AWS charges based on the resources used. And for using a two node Hadoop cluster (with the minimum requirements) along with an instance for the Cloudera Manager for two hours, the cost is around 1$. One important thing to note with any cloud service is to terminate the instances once done or else the cloud provider will continue the billing.

  • Get the `Access Key ID` and `Secret Access Key` and store it in a notepad. The keys will be used when creating EC2 instances. If not there, then generate a new set of keys.


  • Go to the EC2 Management console and create a new Key Pair. While creating the keys, the user will be prompted to store a pem key file. This file will be used to login to the EC2 instance later to install the Cloudera Manager.


  • In the same screen, go to Instances and click on `Launch Instance` to select an EC2 instance to launch.


  • Keep all the default options and click on `Continue`.


  • Select `Ubuntu 12.04.01 LTS` and click on `Select`. This is the instance on which the Cloudera Manager would be running. The Cloudera Manager later will used to setup the CDH cluster and also manage it.


  • Select the `Number of Instances` as 1 and the `Instance Type` as `m1.large`.


  • Use the default options in the below screen.


  • Use the default options in the below screen.


  • Use the default options in the below screen.


  • Select `Choose from the existing Key Pairs` and select the Key Pairs which was created earlier.


  • Select `Create a new Security Group` and open up the ports as shown in the below screen.


  • Make sure all the setting are proper and click on `Launch`.


  • The below confirmation screen will appear, click on close.


  • It will take a couple of minutes for the EC2 instance to start. The status of the instance should change to `running`. Select the instance and copy the public hostname of the instance which we created.


  • Use the key which has been downloaded earlier and the public hostname to login to the instance which was created. Password shouldn't be prompted for logging into the instance.


  • Download the Cloudera Manager installation binaries, change the permissions. Execute the binary to start the installation of Cloudera Manager using sudo.


  • Click on `Next`.


  • Click on `Next`.


  • Click on `Next`.


  • The installation will take a couple of minutes.


  • Once the installation of the Cloudera Manager is complete, the following screen will appear. Click on `OK`.


  • Start Firefox and go to the hostname:7180 (the hostname has to be replaced) and login to the Cloudera Manager using username/password as admin/admin. Noticed that it takes a couple of seconds the Cloudera Manager for the initialization, so the login page might not appear immediately.


  • Click on `Continue`.


  • Select the OS for the Hadoop Nodes, the number of Hadoop nodes and the instance types. Notice that the cluster has the same instance types for both the master and the slaves.


  • Enter the `Access Key ID` and `Secret Access Key` which we got in the earlier step. For the rest, choose the default options.


  • Verify the settings and click on `Start Installation`.


  • It will take a couple of minutes to provision the EC2 instances.


  • Download the key and save it. The key can be used to login to the one of the Hadoop instances.


  • After the EC2 instances are provisioned, now is the time for the installation and configuration of the Big Data related software on all the nodes.


  • The nodes are automatically checked. Make sure all the validations pass through.


  • Now the different services will start automatically. Again, this will take a couple of minutes.


  • Click on the `Services` tab and all the services should be in a Good Health status. From this screen either the individual or all the services can stopped/started.

  •  Click on the Hosts tab to get the list of nodes and their status which should be in Good.

  • Check the HDFS console on port 50070.


  • Check the MapReduce console on port 50030.


  • Go back to the `EC2 Management Console` and there should be one instance for the Cloudera Manager and based on the number of Hadoop nodes, there will be additional nodes.

  • Login to the Hadoop instance using the below command (the hostname has to be changed) and then upload files into HDFS and run MapReduce jobs.

ssh -i cm_cloud_hosts_rsa ec2-user@ec2-184-72-169-149.compute-1.amazonaws.com

  • Once done with the Hadoop cluster make sure to select all the instances and select `Terminate` in the actions tab.

Voila the Hadoop cluster is up and running in a couple of minutes.

Wednesday, April 3, 2013

Phoenix : SQL on HBase

Note : Here is a blog entry from Apache on installing and configuring Phoenix.

Hive can provide an SQL layer on top of HBase. But, Hive is more of batch oriented (aka slow) in nature and cannot be used for interactive ad hoc querying. Though, lately there had been a lot of changes happening to the Hive framework to improve the performance. Toad for Cloud is another tool which enables SQL interaction with the NoSQL databases.

For the past couple of days there had been a flurry of articles (1, 2) and frameworks around executing SQL on Big Data. SQL wrappers on top of Big Data frameworks makes it easy to get started with the Big Data frameworks. The latest in the batch is Phoenix (1, 2) from force.com.

As the title of the Cloudera blog (1) says, it took less than 15 minutes to setup Phoenix on top of an existing Hadoop and HBase Cluster.

Follow this blog on more details on Phoenix.