Tuesday, September 18, 2018

Node fault tolerance in K8S & Devlarative programming

In K8S, everything is declarative and not imperative. We specify the target state to K8S and it will make sure that that the target state is always there, even in the case of failures. Basically, we specify what we want (as in the case of SQL) and not how to do it.
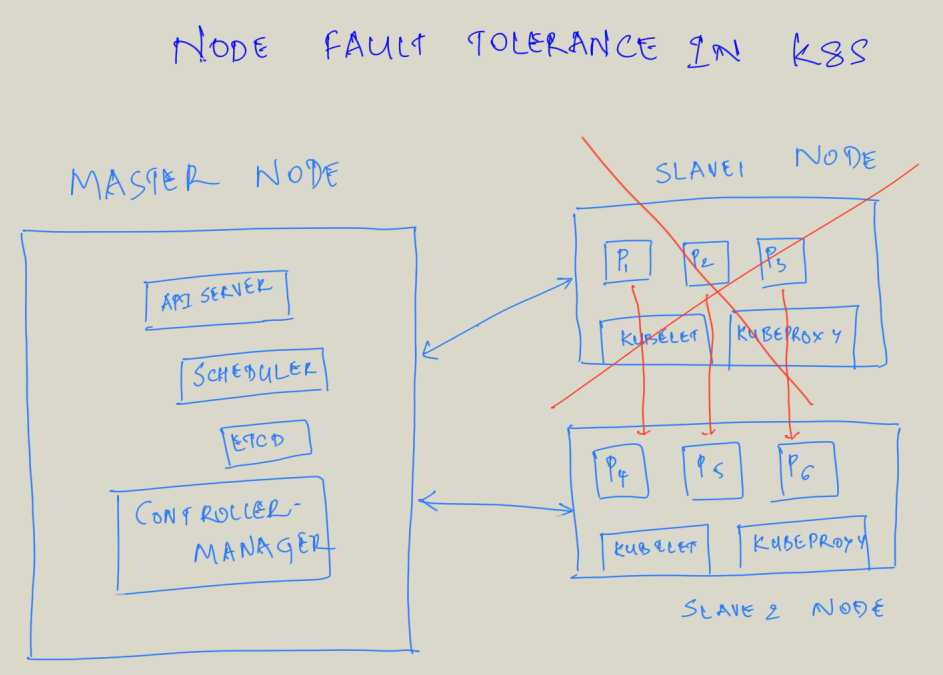
In the above scenario, we have 1 master and 2 nodes. We can ask K8S to deploy 6 pods (application instances) onto the nodes and K8S will automatically schedule the pods across the nodes. In case one of the node goes down, then K8S will automatically reschedule the pods from the failed node to a healthy node. I iterate, we simply specify the target state (6 nodes) and not where to deploy, how to address the failure scenarios etc. Remember declarative and not imperative.

For some reason it takes ~6 minutes for the pods to be rescheduled on the healthy nodes, even after the configuration changes mentioned here. Need to look into this a bit more.

Here is a video demoing the same in a small cluster. We can notice that when one of the node goes down, automatically K8S will reschedule the corresponding pods to a healthy node. We don't need to wake in the middle of the night to rectify a problem as long as have additional resources in case of failures.


Here are the sequence of steps. The same steps can be executed on a K8S cluster on the Cloud or locally on your Laptop. In this scenario, I am running the K8S Cluster on my Laptop. Also, the sequence of steps seem to be lengthy, but can be automated using Helm, which is a package manager for K8S.

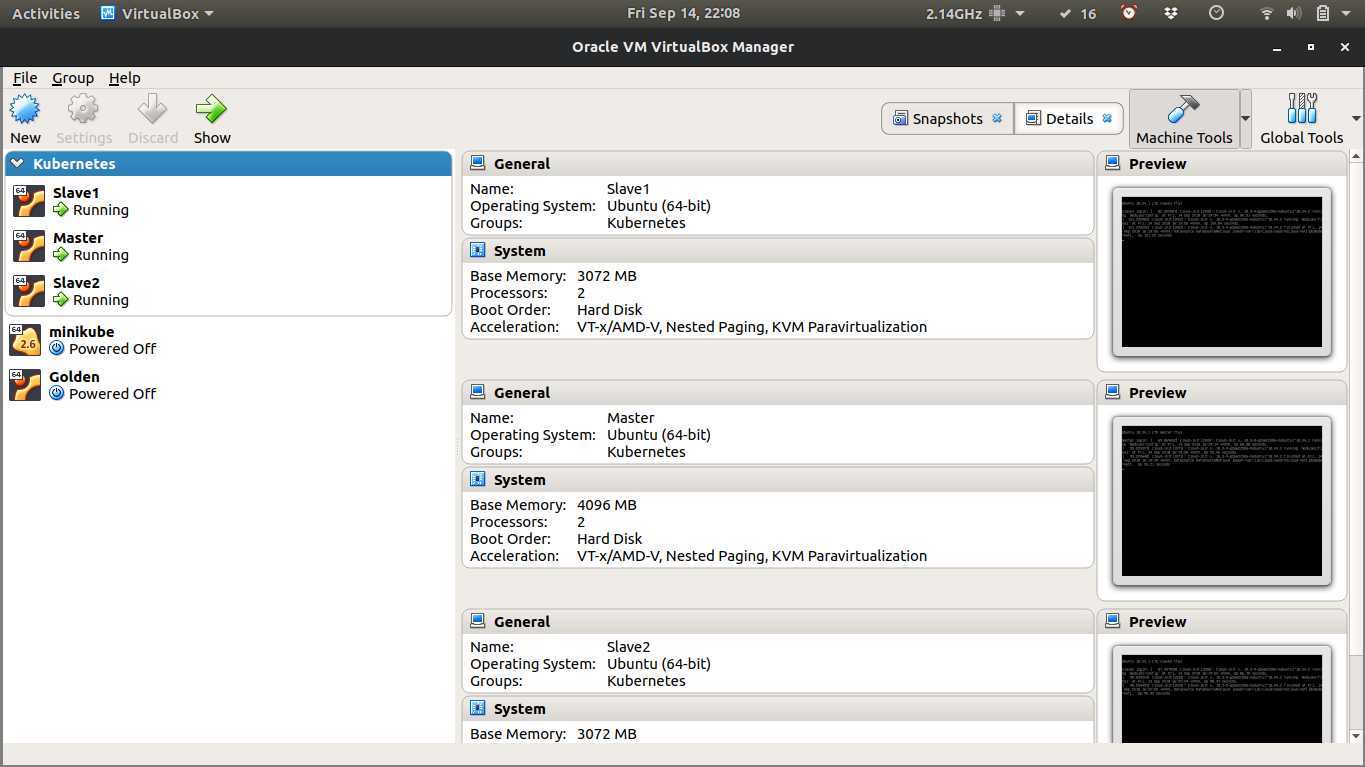
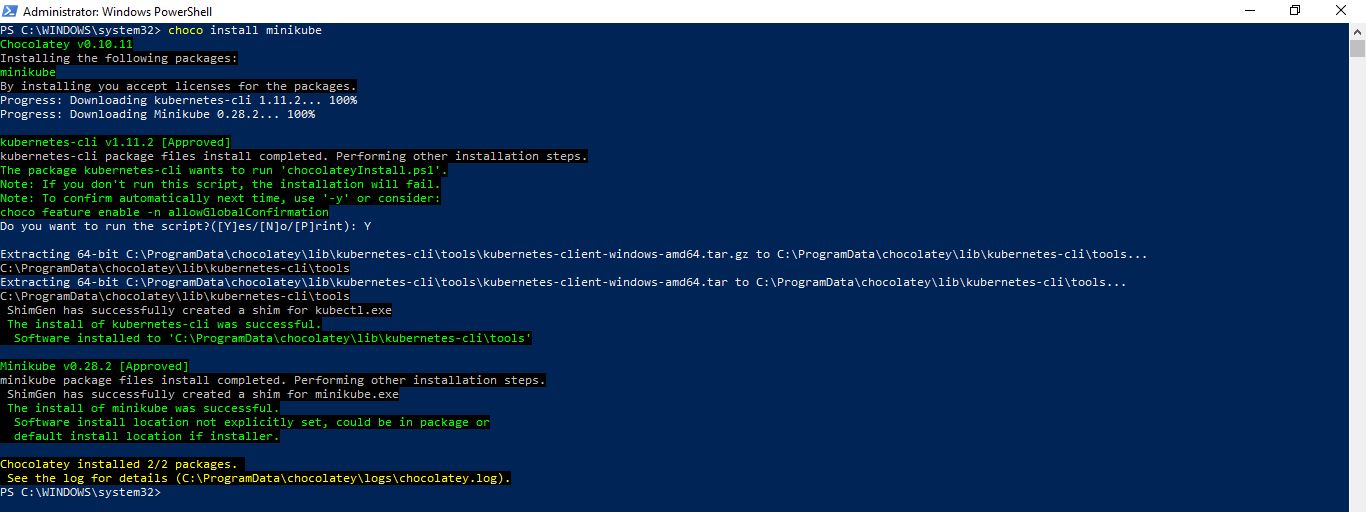
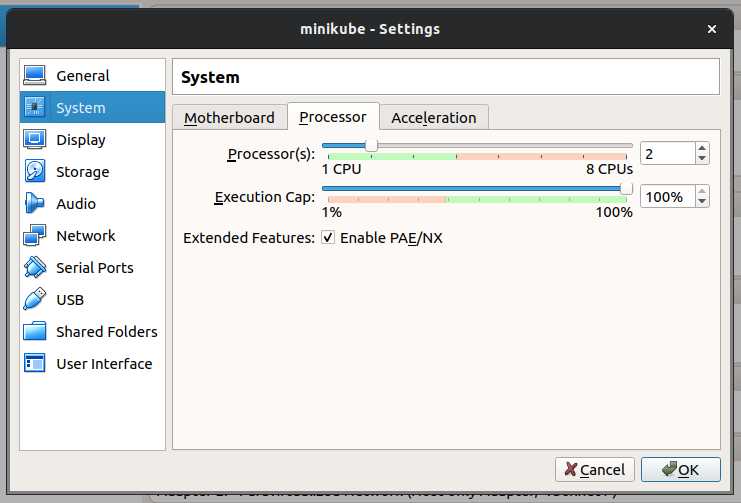
Step 1 : Start the K8S cluster in VirtualBox.

Step 2 : Make sure the cluster is up. Wait for a few minutes for the cluster to be up. Freezing the recording here.
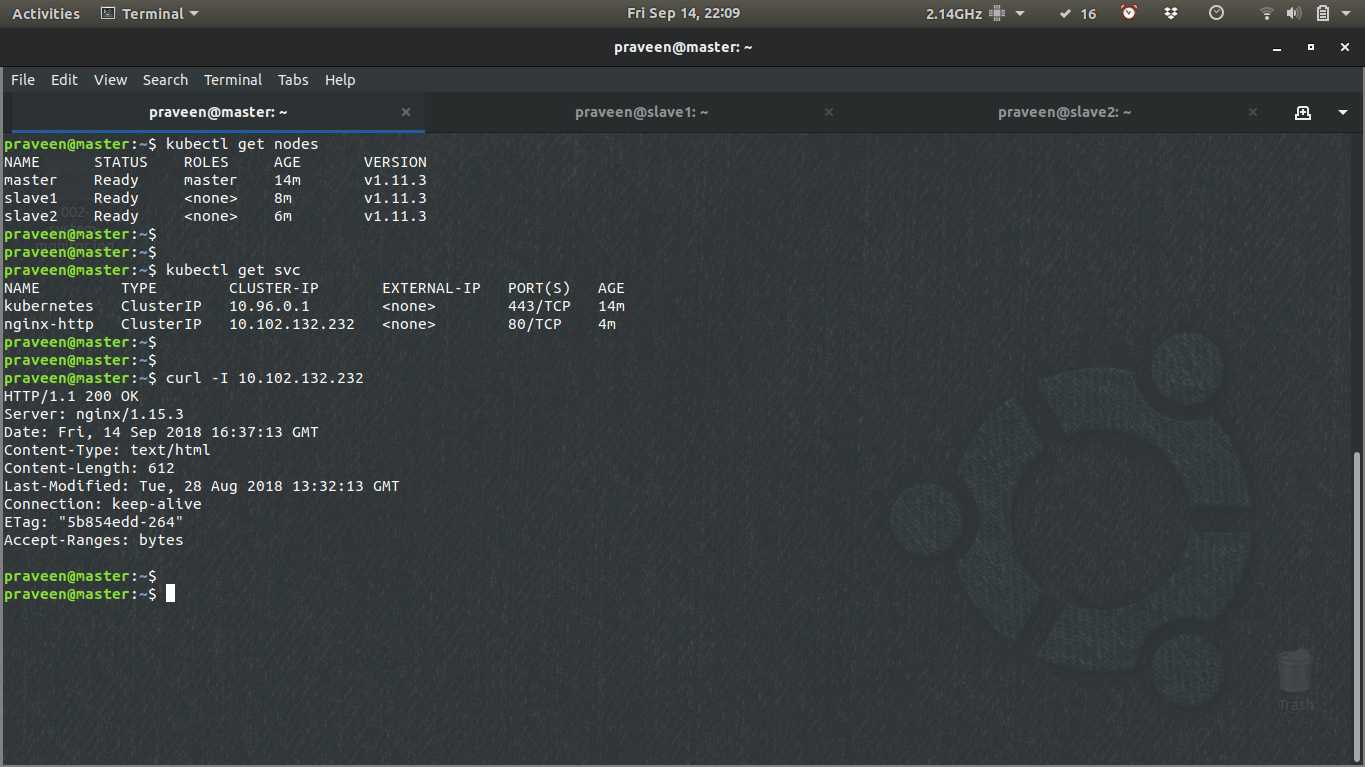
kubectl get nodes

Step 3 : Clean the cluster of all the resources
kubectl delete po,svc,rc,rs,deploy --all

Step 4 : Deploy the Docker ghost image (default replica is 1)
kubectl run ghost --image=ghost

Step 5 : Check the number of pods (should be 1)
kubectl get rs

Step 6 : Check the node in which they are deployed
kubectl get pods -o wide | grep -i running

Step 7 : Scale the application (replicas to 6)
kubectl scale deployment --replicas=6 ghost

Step 8 : Check the number of pods again (should be 6)
kubectl get rs

Step 9 : Check the node in which they are deployed (The K8S scheduler should load balance the pods across slave1 and slave2)
kubectl get pods -o wide | grep -i running

Step 10 : ssh to one slave of the bring down one of the node
sudo init 0

Step 11 : Wait for a few minutes (default ~6min). Freezing the recording here.

Step 12 : Check if the pods are deployed to healthy node
kubectl get pods -o wide | grep -i running

Hurray!!! The pods have been automatically deployed on a healthy node.

Additional steps (not required for this scenario)

Step 1 : Expose the pod as a service
kubectl expose deployment ghost --port=2368 --type=NodePort

Step 2 : Get the port of the service
kubectl get services ghost

Step 3 : Access the webpage using the above port
http://master:port

In the upcoming blogs, I will try to explain a few more features of K8S using demos. Keep looking !!!

Saturday, September 15, 2018

K8S Cluster on Laptop

Why K8S Cluster on Laptop?

A few years back I wrote a blog on setting up a Big Data Cluster on the laptop.  This time it's about setting up a K8S Cluster on the laptop. There are a few Zero-Installation K8S setup which can be run in the browser like Katakoda Kubernetes, Play with Kubernetes and K8S can also be run in Cloud (AWS EKS, Google GKE and Azure AKS). So, why install K8S Cluster on the Laptop? Here a few reasons I can think of.
  • It's absolutely free
  • Will get comfortable with the K8S administration concepts
  • Will know what happens behind the scenes to some extent
  • Above mentioned Katakoda and Play with Kubernetes were slow
  • Finally, because we can :)

More details

As mentioned in the K8S documentation there are a tons of options for installing it. I used a tool called kubeadm which is part of the K8S project. The official documentation for kubeadm is good, but it's  a bit too generic with a lot of options and also too lengthy. I found that the documentation from linuxconfig.org to be good and up to the point. There are few things missing in the documentation, but it's good to get started.

I would be writing a detailed article on the setup procedure, but here a few highlights for anyone to get started.

  • Used Oracle VirtualBox to setup three VMs and installed master on one of them and slaves on the other two.

  • Used a laptop with the below configuration. It has a HDD, an SSD would have saved lot more time during the installation process and also the K8S Cluster boot process (< 2 minutes on HDD).
  • Even after the K8S Cluster was started, the Laptop was still responsive. Below in the System Monitor after starting the K8S Cluster.
  •  Below shows kubectl commands to get the list of nodes, services and also to invoke the service.

Final thoughts

There are two K8S Certifications Certified Kubernetes Application Developer (CKAD) Program and Certified Kubernetes Administrator (CKA) Program from CNCF. The CKAD Certification was started recently and is much more easier than the CKA Certification.

The practice for CKAD Certification can done in Minikube which was discussed in the earlier blogs (Linux and Windows). But, for the CKA Certification setting up a Cluster with different configurations, troubleshooting is required and so setting up a Cluster is required.

Installation using kubeadm was easy, it automates the entire installation process. Installing from scratch would be definitely interesting (here and here). We will get to know what happens behind the scene.

It took a couple of hours to setup a K8S Cluster. Most of the time was spent on installing the Guest OS, cloning it, fine tuning to make sure K8S runs on a Laptop etc. The actual installation and basic testing of the K8S Cluster took less than 10 minutes.

In the upcoming blog, we will look at setting up a K8S Cluster on Laptop. Keep looking !!!

Monday, September 10, 2018

Where is Big Data heading?

Where is Big Data heading?

During the initial days of Hadoop only MapReduce was the supported software and later Hadoop was extended with YARN (kind of an Operating System for Big Data) to support Apache Spark and others. YARN also increased the resource utilization of the cluster. YARN was developed by HortonWorks and later on contributed to the Apache Software Foundation. Other Big Data Vendors like Cloudera, MapR slowly started adopting it and making improvements to it. YARN was an important turn in Big Data.

Along the same lines there is another major change happening in the Big Data space around Containerization, Orchestration and separating storage and the compute part. HortonWorks published a blog on the same and call it as Open Hybrid Architecture Initiative. There is a nice articles from ZDNet on the same.

The blog from HortonWorks is full of detail, but the crux as mentioned in the blog is as below:

Phase 1: Containerization of HDP and HDF workloads with DPS driving the new interaction model for orchestrating workloads by programmatic spin-up/down of workload-specific clusters (different versions of Hive, Spark, NiFi, etc.) for users and workflows.
 

Phase 2: Separation of storage and compute by adopting scalable file-system and object-store interfaces via the Apache Hadoop HDFS Ozone project.

Phase 3: Containerization for portability of big data services, leveraging technologies such as Kubernetes for containerized HDP and HDF. Red Hat and IBM partner with us on this journey to accelerate containerized big data workloads for hybrid. As part of this phase, we will certify HDP, HDF and DPS as Red Hat Certified Containers on RedHat OpenShift, an industry-leading enterprise container and Kubernetes application platform. This allows customers to more easily adopt a hybrid architecture for big data applications and analytics, all with the common and trusted security, data governance and operations that enterprises require.


My Opinion

The different Cloud Vendors had been offering Big Data as a service for quite some time. Athena, EMR, RedShift, Kinesis are a few of the services from AWS. There are similar offerings from Google Cloud, Microsoft Azure and other Cloud vendors also. All these services are native to the Cloud (built for the Cloud) and provide tight integration with the other services from the Cloud vendor.

In the case of Cloudera, MapR and HortonWorks the Big Data platforms were not designed with the Cloud into considerations from the beginning and later the platforms were plugged or force fitted into the Cloud. The Open Hybrid Architecture Initiative is an initiative by HortonWorks to make their Big Data platform more and more Cloud native. The below image from the ZDNet article says it all.
It's a long shot that the different phases are designed, developed and the customers move to it. But, the vision gives an idea on where Big Data is heading.

Two of the three phases are involved with Kubernetes and Containers. As mentioned in the previous few blogs, the way the applications are being built is getting changed a lot and its extremely important to get comfortable with the technologies around Containers.

Abstraction in the AWS Cloud, in fact any Cloud

Sharing of responsibility and abstraction in Cloud

One of the main advantage of the Cloud is sharing of the responsibilities by the Cloud Vendor and the Consumer of the Cloud. This way the Consumer of the Cloud need to worry less about the routine tasks and think more about the application business logic. Look here for more on the AWS Shared Responsibility Model.

EC2 (Virtual Server in the Cloud) was one of the oldest service introduced by AWS, with EC2 there is less responsibility on AWS and more on Consumer. As AWS became more mature and more services have been introduced, the responsibility had been shifting slowly more from the Consumers towards AWS. AWS also had been ABSTRACTING more and more of the different aspects of technology from the Customer.

When we deploy an application on EC2, we need to think about
  • Number of servers
  • Size of each server
  • Patching the server
  • Scaling the server up and down
  • Load balancing and more

On the other end of the spectrum with Lambda, we simply create a function and upload it to AWS. The above concerns and lot more are taken care of by AWS automatically for us. With Lambda we don't need to think about the number of EC2 instances, size of each EC2 and a lot of things.

While driving a regular car we don't need to worry about how the internal combustion of an engine works. A car provides us with an abstraction using a steering wheel, brakes, clutch etc. But, it's better to know what happens below the hood, just in case the car stops in the middle of no where. Same is the case of the AWS services also. The new autonomous cars do provide an even higher level of abstraction, we just need to specify the destination location and the rest of things will be taken care of. Similar is the progress in the different AWS services and in fact any of the Cloud services.

Recently I read an article in AWS detailing the above abstractions and responsibilities here. It's a good read introducing the different AWS Services at a very high level.


Abstraction is good, but it comes at a cost of less flexibility. Abstraction hides a lot of underlying details. With Lambda we simply upload a function and don't really care on which machine it runs nor do we have a choice on what type of hardware we want to run it on. So, we won't be able to do an Machine Learning inference using a GPU in a Lambda function as it requires access to the underlying GPU hardware which Lambda doesn't provide.

Conclusion

 
In the above diagram with different AWS Services as we move from left to right the flexibility of the services decreases. This is the dimension I would like to add  to the original discussion in the AWS article.

The Bare Metal on the extreme left is very flexible but with a lot of responsibility on the Customer, on the other extreme the Lambda function is less flexible but with less responsibility on the Customer. Depending on the requirement, budget and lot of other factors the appropriate AWS service can be picked.

We have Lambda which is a type of FAAS as the highest level of abstraction, I was thinking what's next abstraction on top of Lambda/FAAS. Any clue?

Thursday, September 6, 2018

How to run Windows Containers? Not using Minikube !!!

How we ran Minikube?

In the previous blog we looked at installing Minikube on Windows and also on Linux. In both the cases, the software stack is the same except replacing the Linux OS with the Windows OS (highlighted above). The Container ultimately runs on Linux OS in both the cases, so only Linux Containers and not the Windows Containers can be run in case of Minikube.

How do we run a Windows Container then?

For this we have to install Docker for Windows (DFW). Instructions for installing here. Prerequisite for DFW is support for Hyper-V which is not available in Windows Home Edition, need to upgrade to a Pro edition. In DFW K8S can be enabled as mentioned here.
There are two types of Containers in the Windows world, Windows Containers which runs directly on Windows and shares the host kernel with other Containers. And the other type of Container is Hyper-V Container which has has one Windows Kernel per Container. Both the types of Containers are highlighted in the above diagram and are detailed here.

The same Docker Windows image can be run as both Windows Container and Hyper-V Container, but the Hyper-V container provides an extra isolation. The Hyper-V Container is as good as a Hyper-V Virtual Machine, but uses a light weight and tweaked Windows Kernel. Microsoft documentation recommends using Windows Containers for stateless and Hyper-V Containers for stateful applications.

As seen in the above diagram the Windows Container runs directly on top of the Windows Pro OS and doesn't use any Virtualization, but Hyper-V is a prerequisite for installing Docker for Windows, not sure why. If I get to know I will update the blog accordingly.

Conclusion

In this blog, we looked at a very high level on running Windows Containers. Currently, I have Windows Home and Ubuntu as dual boot setup. Since, I don't have a Windows Pro with Hyper-V enabled, I am not able to install Docker for Windows. Will get Windows updated to Pro and will write a blog on installing and using Docker for Windows. Keep looking !!!

On a side note, I was thinking about setting up an entire K8S cluster on Windows and looks for now it is not possible. The K8S documentation mentions that the K8S control plane (aka master components) have to be installed on a Linux machine. But, Windows based worker nodes can join the K8S cluster. Maybe down the line, running an entire K8S cluster on Windows will be supported.

Note : Finally I was able to upgrade my Windows Home to Professional (here),  enable Hyper-V (here) and installed Docker for Windows (here).

Installing Minikube on Windows

Introduction

In the previous blog, we looked at installing Minikube on Linux. In this blog we will install Minikube on a Windows machine. To my surprise installation has been dead easy as in the case of Linux.

Installing Minikube on Windows

  • Install VirtualBox as mentioned here. The blog is somewhat old, but the instructions are more or less the same for installing VirtualBox.
  • Install Chocolatey which is a Package Manager for Windows using the instruction here. From here on Chocolatey can be used to install/update/delete Minikube. It's some what similar to apt and yum in the Linux environments. I have done the same using PowerShell, but the same can be done using the command prompt also.
  • Now it's time to install Minikube as mentioned here, we will use Chocolatey for the same. The 'choco install minikube' command will install Minikube and not the VM in VirtualBox.
  • Now is the time to run 'minikube start' command. This will download/configure the K8S VM, log into the VM and start a few services and also setup kubectl on the host to point towards the VM. Although the VM has started, the status in VirtualBox is shown as 'Powered Off'. Not sure why.

  • Login into the VM using the 'minikube ssh' command and issue the 'sudo init 0' to terminate the VM. Run the 'minikube start' command to start the VM again.

Conclusion

In the earlier blog, we installed minikube on Linux and this time on a Windows machine. In both the cases it runs a Linux OS in VirtualBox and so only a Linux container can be run on Minikube, but still we would be able to learn many aspects of K8S. In the upcoming blogs, we will look at the different concepts around K8S and try them out.

In the upcoming blog, we will explore running a Windows container obviously on Windows OS.

Tuesday, September 4, 2018

Getting started with K8S with Minikube on Linux

Why Minikube?

As mentioned in the previous blog, setting up K8S is a complex task and those new to Linux, it might be a bit of challenge. And so we have Minikube to the rescue. The good thing about Minikube is that it requires very few steps and runs on multiple Operating Systems. For those curious there are tons of ways of installing K8S as mentioned here.

Minikube sets up a Virtual Machine (VM). The VM is very similar to those from Cloudera, HortonWorks and MapR which are used for Big Data. These VMs have the different softwares already installed and configured. These make them easy for those who want to get started with the respective softwares and also for demos. But, these VM are not good for using in production.

Minikube is easy to use, but there are a few disadvantages of it. It runs on a single node, so we won't be able to try some of the features like response to a node failure, some of the advanced scheduling. But, still Minikube is nice to get started with K8S.

Installing Minikube on Ubuntu

I tried out the instructions as mentioned here and they work as-is for Ubuntu 18.04, so I thought of not repeating the same in this blog. Go ahead and follow the instructions for completing the setup of Minikube. Here are a few pointers though.

  • When we run the 'minikube start' for the the first time it has to download the VM and so is a bit slow, from then on it's fast.
  • In the VirtualBox UI, the minikube VM will be shown as below in running state. Note that the VM image has been downloaded configured and started.
  • By default not much memory and CPU are allocated to the VM. So, first we need to shutdown the VM as shown below. The status of the VM should be changed to powered off.

  • Now go to the settings of this particular VM and change the memory and the CPU settings. Make sure not to cross the green line as per the VirtualBox recommendations. After making the resource changes, start the minikube again. Notice that the VM will not be download this time.


Conclusion

Now that we looked at how to setup to Minikube on Ubuntu, I am aware not everyone has Ubuntu, so we will explore installing Minikube on Windows also.
Also, we will slowly explore the different features of K8S in the upcoming blogs. So, keep looking.

Monday, September 3, 2018

'Kubernetes in Action' Book Review

What is Kubernetes?

Previously we looked at what Dockers and Containers are all about. They are used to deploy microservices. These microservices are light weight services and can be in tens and with hundreds of replications. Ultimately this leads to thousands of containers on hundreds of nodes/machines. This brings some complex challenges.
  • The services in the containers are deployed on nodes which are least utilized and have the required resources like SSD/GPU and is not deterministic. Then how do the services discover each other?
  • There can different failures like network, hardware. How to make sure that at any point of time a fixed number of containers are available irrespective of the failures?
  • Application updates are a norm. How do we update such that there is no downtime of the application? Blue-Green, Canary deployment ....
Like wise there are many challenges which are a common concern across multiple applications when working with microservices and containers. Instead of solving these common concerns in each of the applications, Kubernetes (K8S) does this for us. K8S was started by Google and later on maintained by Cloud Native Computing Foundation (CNCF). Google a few days back took a step back on K8S and let others in the ecosystem get more involved in it.

Although Google started K8S, a lot of other companies have adopted it. AWS EKS, Google K8S Engine (GKE), AKS to name a few. This is another reason why we would be seeing more and more of K8S in the future.

Who doesn't love comics. Here is one on K8S from Google and another here. Another simple Youtube video here.

Review of Kubernetes in Action Book

  • The Kubernetes in Action Book starts with a brief introduction about Docker and K8S. And jumps into the practical aspects of K8S. Wish there was a bit more about Docker.
  • As with any other book the starts with simple concepts and gradually discusses the complex topics. Lot of examples are included in the book.
  • K8S ecosystem is growing rapidly. The only gripe is that the K8S ecosystem is not included in the book.

Conclusion

K8S is a complex piece of software to setup if one is new to Linux. There are multiple ways of setting up K8S as mentioned here. One easy way is to use a preinstalled K8S cluster in the Cloud. But, this comes at a cost and also not everyone is comfortable with the concepts of Cloud.

So, there is Minikube which is a Linux virtual machine with K18S and the required softwares already installed and configured. Minikube is easy to setup and runs on Windows, Linux and Mac. In the future blogs, we will look at the different ways of setting setting up K8S and how to use the same. Keep looking !!!

Finally would recommend the Kubernetes in Action book to anyone who wants to get started with K18S. The way we build applications had been moving from monolithic to microservices way and K18S accelerates the same. So, the book is a must for those who are into software.

Friday, August 31, 2018

'Learn Docker - Fundamentals of Docker 18.x' Book Review

What is Docker?

In the previous blog we looked at Docker/Containers at a high level and also compared VirtualBox with Dockers. VirtualBox and others like Xen, KVM, HyperV provide hardware level virtualization while Dockers/Containers provide OS level virtualization. Because of which Docker/Containers are lightweight.

Below is the virtualization using VirtualBox. As noticed multiple OS kernels which provides the application level isolation run on the same hardware making it heavy and also inefficient.


Here is the application level isolation provided by containers. As noticed the OS kernel is only run once for all the applications. This makes it efficient.


How to install Docker?

Docker can be installed/run on Windows, Mac and Linux. As I had been using Ubuntu as my primary OS, I followed the instructions for Linux. There is much more easier way to try Docker without any installation with all in a browser by using Play with Docker, every thing runs in the Cloud. It uses a concept called Docker in Docker (DID). All we need to do is to create an account with Docker and get started for free. Here we can try Docker on a single node or on a cluster of 5 nodes. Play with Docker is for the sake of learning, prototyping, demos and not for production purpose.

Review of Learn Docker Book

To explore more into Dockers, recently I completed reading the Learn Docker - Fundamentals of Docker 18.x and would be reviewing the book here.

  • The book starts with a light note on containers, ecosystem and then deep dives into Docker. The good think  about the book it is that it slowly increases the complexity towards the end of the book, this makes it easy for those who don't know what Docker is all about.
  • The book has equal emphasis on theory and practice. As soon as a concept is discussed immediately the complete example code and how to execute the same wherever appropriate is given. Once Docker has been installed, the examples can be tried out. Most of the cases the code can be executed as-is.
  • The book doesn't end at Docker, but also explains about container orchestration. There is in fact a few chapters on the inbuilt Docker orchestration layer Swarm and also on the latest Kubernetes again with examples. There are also few chapters on Dockers and orchestration in the Cloud.
  • It's not just about development against Docker, but also about making it production ready. There are a few sections on Security, Load Balancing, Blue-Green/Canary deployment, Secrets to name a few.
  • At the end of each chapter, there is a section for further reading to explore further. Also, included is a small quiz with answers.

Conclusion

I would definitely recommend Learn Docker - Fundamentals of Docker 18.x for anyone who is trying to get started with Docker. As mentioned Docker can be installed on Windows, Mac and Linux. If we don't want to install Docker, then Docker can be tried for free at PWD (https://labs.play-with-docker.com/).

Wednesday, August 1, 2018

Upgrading from Ubuntu 16.04 (Xenial Xerus) to 18.04 (Bionic Beaver)

I had been using Ubuntu for quite a few years and lately had been using Ubuntu 16.04 along with Windows 10 as dual boot on my Lenovo Z510. Ubuntu for pretty much everything and Windows for any software which is not compatible with Ubuntu. This has been a deadly combination which worked for me pretty well.

Why the upgrade in Ubuntu?

In Ubuntu 16.04 pretty much everything was working well, except the suspend and hibernate. The system was not able to resume from suspend every time. The only option left was to shutdown and restart the computer along with all the applications, which is not really nice.

Checking the different Ubuntu forums and trying out different suggested solutions didn't fix the problem. So, finally decided to upgrade Ubuntu to the latest version. There is a probability that the upgrade process got messed up and the data is lost. My data is backed up automatically to the different Clouds, so this was not an issue.

Ubuntu released 18.04 in April, a few months back. But, upgrade process from 16.04 (Xenial Xerus) to 18.04 (Bionic Beaver) is not recommended. Upgradation to the point release 18.04.1 is the safest approach. It gives Canonical time to fix the bugs and make the transition smoother.

So, as soon as 18.04.1 announced, I took a shot and upgraded to Ubuntu 18.04.1 by following the instructions mentioned here.

How was the Ubuntu upgradation?

During the initial days of Ubuntu, upgradation from one version to another messed up the Operating System, but it was really smooth this time. Here I am with the latest Ubuntu after a reboot.

Ubuntu 18.04 (Bionic Beaver) Desktop

The download and installation process took about 2 hours with a good number of prompts in between. Wish there was a 'Yes to all' option during the process which would have made the installation process unattended.

Was everything smooth after the upgradation?

Usually any software upgrade will have some major/minor issues which will get fixed overtime, same is the case with Ubuntu. Here is a list of some issues to start with. I am sure to update the list the more I use the latest Ubuntu and also with the possible solutions if any.

  • Ubuntu was using Unity UI and moved to GNOME, so it takes some time to get used to the new UI. But, my initial impressions are good with GNOME.

  • I had been using Phatch to batch mark the images on this blog, but it has been removed from the Ubuntu repository. Quick Googling around gave Converseen as an alternative which I am yet to try.

  • Right click on the mouse stopped working and has been replaced with two-finger click. There were a couple of solutions and quick try of some of them didn't work. Again it will take some time to get used to the two-finger click.

  • The good thing is that suspend start working and I was able to resume where I stopped. This basically increased the productivity and the focus. When I used the Nvidia display driver instead of the default open source Nouveau display driver, the suspend functionality broke and I had to revert to the Nouveau display driver.

  • Should I upgrade?

    If Canonical is supporting the Ubuntu version which you had been using for the next few years and there is no hard pressing issue like suspend in my case then I would recommend to stick to the current OS. Again, if you want to try the latest technology like me, then go ahead with the upgrade.

    Monday, July 30, 2018

    Compatibility between the Big Data vendors

    What the Big Data vendors have to offer?

    Finally that the Big Data wars have pretty much ended, we have got Cloudera, MapR and Hortonworks as the major Big Data vendors. There are also other pure vendors that focus on one or two Big Data softwares (like DataStax on Apache Cassandra), but the above mentioned Cloudera, MapR and Hortonworks vendors provide a complete suite of softwares covering storage, processing, security, easy installation etc. These vendors solve some of the problems like

    • Integrating the different softwares from Apache. Not every Big Data software from Apache is compatible with other. These vendors make sure that the different softwares from Apache play nice with each other.

    • Installation and fine tuning of the Big Data softwares is not easy. It's no more download and click. These vendors make the installation process easier and automate as much as possible.

    • Although the software from Apache is free to use. Apache Software Foundation doesn't provide any commercial support. Companies like Cloudera, MapR and Hortonworks fill the gap as long as the software from these vendors is being used.

    Friday, July 6, 2018

    What is DIGITAL?

    Very often we hear the word DIGITAL in the quarterly results of the different IT companies especially in India. The revenue from the DIGITAL business is compared with the traditional business. So, what is DIGITAL? There is no formal definition of DIGITAL, but has been loosely used by different companies as mentioned lately.

    But, here is the definition of DIGITAL in an interview at MoneyControl (here) by Rostow Ravanan, Mindtree CEO and MD. This is a bit vague, but the best I could get till now. The vagueness comes from the fact that it doesn't say what BETTER is. Does anyone see something missing? I see IOT missing. Lately I had been working on IOT and would be writing my opinion on where IOT stands as of now.

    Q: Digital is still a vague term in the minds of many. What does it mean for you?

    A: So let me go back a little bit and tell you what we define as digital. We define digital and we put that in our factsheet, whenever we declare results every quarter.

    In our definition of digital, we take one or two ways of defining it. To a business user, we definite digital from a business process perspective to say anything that allows my customer to connect to their customer better or anything that allows my customer to connect to their people better is one way of defining digital from a business process point of view.

    Or if you were to look at digital from a technology definition point of view, we say it is social, mobility, analytics, cloud, and e-commerce. From a technology point of view, that is how we define digital.