A lot of times we do create multiple EC2 instances and install the same software on each one of them manually, this can be for trying out a Load Balancer feature or to test routing with High Availability across different Regions and Availability Zones. One way to avoid this manual process is to create an AMI, but they are immutable and a new AMI has to be created for even small changes. This is where tmux (Terminal Multiplexer) comes into play.
Step 2: Download pagent.exe from here (1) and click on "Add Key" and point to the Private Key in the ppk format. Close the window.
Step 3: Connect to the EC2 instance names as "WS1/Jump/BastionBox" via Putty. In the "Host Name (or IP address)" specify the username and the IP as show below.
Go to "Connection --> SSH --> Auth" and make sure to select "Allow agent forwarding". This makes it easy to connect to the EC2 instances, as there is no need to specify the Private Key, it would be picked from pagent.exe. Click on "Open" to connect to the EC2 instance.
Step 4: Execute the tmux command to start it.
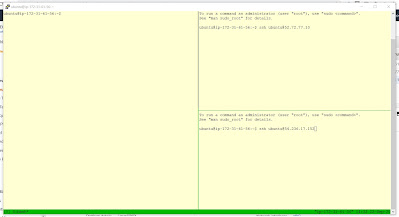
Step 5: Enter "Ctrl + B" and "%" to split the panes horizontally. Again enter "Ctrl + B" and "Double Quotes" to split the panes vertically. Now we should see three panes as shown below. Use the "Ctrl + B" and the arrow buttons to navigate the panes.
Step 6: On the right side upper and bottom panes execute the "ssh ubuntu@ip" command to login to the EC2 instances. Make sure to replace the IP address of WS2 and WS3 EC2 instances in the command.
Step 7: Now we are connected to three EC2 instances as shown below. Execute the "ifconfig" command on all the panes and note that the IP address should be different. This is to make sure we are connected to different EC2 instances.
Step 8: Now we will turn on the synchronization across the panes, this way any command executed on the panes will be automatically executed on the other panes also automatically. For synchronization to happen enter "Ctrl-B " and ":" and "setw synchronize-panes on" and "Enter Button". Use the setw command with "off" options to turn off the synchronization across the panes.
Conclusion
When we want to automate tasks AWS provides a few means like SSM, OpsWorks, AMI and so on. But, there are good for automating on the long run, but not good when we want to try different things in an iterative approach or we are really not sure what we want to do.
This is where tmux with the synchronization feature comes handy. There is lot more to tmux, but hope this blog articles helps you to get started with tmux and builds the curiosity around it.


No comments:
Post a Comment