Wednesday, April 26, 2017

Scratch programming for kids

It's summer holidays and I had been helping my kid (8 years) get started with programming. So I bought the Computer Coding for Kids book by Carol Vorderman. The books covers initially Scratch (from MIT) and then Python from the basics. Scratch is a visual programming language which is easy for those who are just getting started with programming. No need for typing code, more of drag and drop.

So, here is his first program (link here), a small and cute game in Scratch. Click on the flag on the top right, to get the game started. He was all excited to get it published in this blog. One thing to notice is that the execution of the game requires Adobe Flash, which is slowly getting out of fashion with the different browsers because of the vulnerabilities and stability issues. For some reason, I was able to get it run only in IE and not in Edge/Chrome/Firefox browsers.


Scratch looks a bit basic, but I have seen some interesting programs developed in it. I would recommend the above mentioned book for anyone who wants to get started with programming. Carol has written a few more books, which I plan to buy once we complete this book.

Monday, April 24, 2017

Creating a Linux AMI from an EC2 instance

In one of the earlier blog, we created a Linux EC2 instance with a static page. We installed and started the httpd server, created a simple index.html in the /var/www/html folder. The application in the EC2 is too basic, but definitely we can build complex applications.

Lets say, we need 10 such instances. Then it's not necessary to install the softwares, do the necessary configurations multiple times. What we can do is create an AMI, once the softwares have been installed and the necessary configuration changes have been made. The AMI will have the OS and the required softwares with the appropriate configurations. The same AMI can be used while launching the new EC2 instances. More about the AMI here.


So, here are the steps

1. Create a Linux EC2 instance with the httpd server and index.html as shown here.

2. Once the different softwares have been installed and configured, the AMI can be created as shown below.


3. Give the image name and description and click on `Create Image`.


4. It takes a couple of minutes to create the AMI. The status of the same can be seen by clicking on the AMI link in the left side pane. Initially the AMI will be in a pending state, after a few minutes it will change into available state.


5. On launch a new EC2 instance, we can select the new AMI which was created in the above steps in the `My AMIs` tab. The AMI has all the softwares and configurations in it, so there is no need to repeat the same thing again.


6. As we are simply learning/trying things and not anything in production, make sure to a) terminate all the EC2 instances b) dregister the AMI and c) delete the Snapshot.


Now that we know how to create an AMI with all the required softwares/configurations/data, we will look at AutoScaling and ELB (Elastic Load Balancers) in the upcoming blogs.

Creating an alarm in CloudWatch for a Linux EC2 instance

AWS CloudWatch does a couple of things as mentioned in the AWS documentation here. But, one of the interesting thing is that it can gather the metrics (CPU, Network, Disk etc) for the different Amazon resources.

In this blog, we will look how to look at the CPU metrics on a Linux EC2 instance and trigger an Alarm with a corresponding action. To make it simple, if the CPU Utilization in the Linux instance goes beyond 50% then we will be notified through an email. We can watch different metrics, we will use CPU Utilization for now. CloudWatch also allows to create custom metrics, like the application response time.

I will go with the assumption that the Linux instance has already been created as shown in this blog. So, here are the steps.

1. In the Linux instance make sure that the detailed monitoring is enabled. If not then enable it from the EC2 management console as shown below.


2. Go to the CloudWatch management console and select Metrics on the left pane. Select EC2 in the the `All Metrics` tab.


3. Again select the `Per-Instance Metrics` from the `All Metrics` tab.


4. Go back to the EC2 management console and get the `Instance Id` as shown below.


5. Go back to the CloudWatch management console. Search for the InstanceId and select CPUUtilization. Now the line graph will be populated as shown below for the CPUUtilization. We should be also able to select multiple metrics at the same time.


6. The graph is shown with a 5 minute granularity. By changing it to minute granularity, we would be getting a much smoother graph. Click on `Graphed Metrics` tab and change the Period to `1 minute`.


7. Now, lets try to create an Alarm. Click on Alarm in the left pane and then on the `Create Alarm` button.


8. Click on the `Per-Instance Metrics` under EC2. Search for the EC2 instance id and select CPUUtilization as shown below.


9. Now that the metric has been selected, we have to define the alarm. Click on `Next`. Specify the Name, Description and CPU % as shown below.


10. When the alarm is breached (CPU > 50%), then the notification has to be done. In the same screen, go a bit down and specify the notification by click on `New list` as shown below.


11. Click on `Create Alarm` in the same screen. To avoid spamming, AWS will send an email with the confirmation link which has to be clicked. Go ahead and check your email for confirmation.


12. Once the link has been clicked in the email, we will get a confirmation as below.


13. Now, we are all setup to receive an email notification when the CPU > 50%. Login to the Linux instance as mentioned in this blog and run the below command to increase the CPU on the Linux instance. The command doesn't do anything useful, but simply increases the CPU usage. There are more ways to increase the CPU usage, more here.
dd if=/dev/urandom | bzip2 -9 >> /dev/null

14. If we go back to the Metrics then we will notice that the CPU has spiked on the Linux instance because of the above command.


15. And the Alarm also moved from the OK status to the ALARM status as shown below.


16. Check your email and there would be a notification from AWS about the breach of the Alarm threshold.

17. Make sure to delete the Alarm and terminate the Linux instance.

The procedure is a bit too long and it took me good amount of time to write this blog, but once you do it a couple of times and understand whats being done, then it would be a piece of cake.

Friday, April 14, 2017

Got through `AWS Certified Developer - Associate`

Today, I got through the AWS Certified Developer - Associate. This is the second certification around AWS (first certification here). It had been a bit more tough than I expected, but it was fun. Anyway, here is the certificate.


There were 55 questions which had to be solved in 80 minutes. It was a bit tough and I did spend till the last minute solving and reviewing the questions. As usual, nothing beats the practice to get through the certification.

The next certification I am planning is `AWS Certified SysOps Administrator - Associate` and then the `AWS Certified Big Data - Specialty` Certification. The Big Data Certification is in Beta and I am not sure when Amazon would make it available to the public. This is the certification which I am really interested, as it is an intersection of Big Data and the cloud.

Thursday, April 13, 2017

Which EBS type to use to meet our requirements?

In the previous blog, I pointed to the approach to figure out the best way to pick the best EC2 instance to meet our requirements. Here is a video to pick the best EBS type. EBS (Elastic Block Storage) is like a Hard Disk Drive which can be attached to the EC2 instance.


The way AWS provides different EC2 instances, there are different EBS types which are basically categorized into SSD and Magnetic. Depending upon if we are looking at high IOPS or throughput, the appropriate EBS type can be picked. Here is a flow chart in the same video to figure out the type of EBS to pick.

One interesting thing to note about EBS is that the EC2 instance and EBS need not be on the same physical machine. That is, the processing and the disk need not be on the same machine. There is a low latency and high throughput between the EC2 and EBS machines.

A good amount of the AWS videos are really good and some of them are so-so. I would be promoting the videos which are really interesting in this blog for the readers.

Which EC2 instance to use to meet our requirements?

In the previous blogs, we looked at creating a Linux and a Windows instance. There are lots of parameters which can be configured during the instance creation. One of the important parameter is in the instance type and size. AWS provides many instance types as mentioned here. While some of them are optimized for CPU, others are optimized for Memory etc. It's important to pick up a right instance type to meet our requirements. If we pick a smaller instance, we won't be able to meet the requirements. On the other end, if we pick a larger instance then we need to pay more.

So, which one do we pick? Here is a nice video from the nice AWS folks on picking the right EC2 instance to match the requirements. In the same video here , there is also a flow chart to help you pick the right instance type.


Without the Cloud, we need to do the sizing and the capacity planning carefully as per our requirements before ordering the hardware, as we are stuck to it. With the Cloud, we can try an instance, identify the bottle necks and move to another instance type without any commitment. Once, we are sure of the proper EC2 type, then we can also go with the Reserved Instances. That's the beauty of the cloud.

Amazon has been introducing new EC2 instance types regularly, so picking the right EC2 instance is a continuous exercise to leverage the benefits of the new EC2 instance types.

Monday, April 10, 2017

Finding all the AWS resources in our account

Recently I was talking to someone about creating an account with AWS. The immediate response I got was, `AWS was charging me continuously month to month although I was not consuming any of the service`. Many times I noticed that the users of AWS start a service and forget to stop the same, the same happened to me a couple of time. Once, I started an ELB (Elastic Load Balancer) and forgot to stop the same, the ELB was running the whole night. Luckily, the hourly rate for the ELB was less and I was not charged much for the same.

One way to identify the problem is to create a Billing Alarm as shown in the previous blog.  Once we are notified of the billing, we need to identify the AWS resources which we are using and then take an action on them. But, there are 13 Regions and many services within each Region. It's difficult to go through all the services in each Region, to figure out what are all the AWS resources which we are consuming. One way is to use `Resource Groups`.

1. Go to the AWS Management Console and click on the `Resource Groups` and the `Tag Editor`.


2. In the Regions Box, select all the Regions and in the `Resource types` select `All Resource Types` and then click on `Find Resources`. All the Resources which are being used from this account will be shown as below.


3. Now, we can click on the link in the `Go` column of a particular resource and take some action like stopping it, if not required.

One of the main disadvantage of the Cloud is that the resources can be spawned in a few seconds, without much consideration if is actually required or not. Let's say the EC2 instance type is not meeting our Non Functional Requirements (NFR), then another instance can be easily started without fine tuning the existing EC2. Slowly, we end up with a lot of unnecessary AWS resources.

Also, note that not all the AWS resources will be charged. For example, a Security Group is not charged, so I can create a Security Group and forget about it. While, I cannot do the same thing with an EC2 instance.

Note : Another way to figure out AWS resources is by using the AWS Config service as mentioned here and here. Note that AWS Config only supports few AWS Services and more are being added on a regular basis, so the results from the AWS Config are not comprehensive.

Creating a Billing Alarm in AWS

AWS provides a couple of free resources for 1 year from the time of account creation (free tier). Not all the services are free, it's very easy to use AWS resources unknowingly and start the billing. Like creating an EC2 instance, other than t2.micro.

To get around this problem, AWS provides Billing Alarms. I have created a Billing Alarm for when my monthly AWS expenses cross 10$ to send me an email alarm as shown below. Here is the documentation for the same. Wherever possible, I would be providing the references to AWS documentation, instead of repeating the same here.


AWS Regions and Availability Zones

The EC2 instance which we created was in North Virginia. This is called a Region in the AWS terminology, which is a separate geographic area. The Region can be selected from the top right of the AWS management console as shown below.


The price for the different services change from Region to Region. For ex., the hourly cost of creating an EC2 instance in Mumbai Region is different from the North Virginia Region. Usually, I do select the North Virginia Region when I try to explore some thing new in AWS as resources in North Virginia Region are the cheapest when compared to the other Regions. You can check the EC2 on-demand pricing for the different Regions here. By changing the Region, the price will change automatically.

For the sake of HA (High Availability) we can create an EC2 instance in North Virginia Region which acts like a primary server and the backup server can be created in Mumbai Region. If there is a problem in one Region, still we have the servers in another Region.

Each Region is a separate geographic area. And within each Region there are multiple Availability Zones (AZs) as shown below. A Region has at least 2 AZs. As of this writing there are 16 Regions and 42 AZs and Amazon is expanding them on a regular basis. Each AZ will have redundant power, networking and other resources. This way there is no common point of failure across any two AZs. Note that, each AZ need not be a single Data Center, it can more than one Data Center. More details here and here.


The Region can be selected by using the drop down option as mentioned above and the AZ can be selected at the time of the resource creation like an EC2 as shown below.


Lets say say we want to create 4 EC2 instances in a particular Region. Instead of creating them in a single AZ, it's a best practice to create them across multiple AZs in a balanced fashion as it provides better HA. By default, when we create any resource in AWS, we have to go with the assumptions that THINGS WILL FAIL and architect for HA.

Lets look in a bit more detail. In the Mumbai Region (ap-south-1), there are two AZs (ap-south-1a and ap-south-1b). Within Ohio (us-east-2) there are three AZs (us-east-2a, us-east-2b and us-east-2c). The requirement is to create 4 EC2 instances.

In the below, we are creating all the EC2 instances in a single AZ (ap-south-1a). So, if there is any problem in that particular AZ then the entire service will be down.


To avoid the above mentioned problem, it's recommended to create the instances in different AZs as shown below and also have a backup instances in a entirely different Region.

Another reason besides HA to have instances in different Regions, might be for the sake of compliance. The industry regulations might suggest, that the servers should be in different Regions.

Then how to dynamically shift the load from the primary instances to the backup instances in the case of a failure? This can be done using Route53, which we will be looking in a future blog.

Sunday, April 9, 2017

Creating a static website on a Linux EC2 instance

Now that we know how to create a Linux EC2 instance in the AWS Cloud and access the same, we will create a simple static web site on the same.

1. When we created a Security Group, the port 22 was opened. This will enable the access to the remote machine. But, a WebServer listens to port 80 and the same has to be opened.

2. Select the Security Group and click on the Inbound tab.


3. Click on Edit and the rule for the HTTP inbound traffic as shown below.


Now, the Security Group rules should appear like this.


Note that if the Linux or the Windows instance is running, then any changes to the Security Group will take place immediately. There is no need to restart the EC2 instance.

4. The best practice is to update the package on the Linux instance with the `sudo yum update -y`. When prompted select yes.

5.  Install the WebServer and start it. The first command to elevate the user to root, the second command will install the WebServer and the final one will start the same.
sudo su
yum install -y httpd
service httpd start
The WebServer won't start automatically, if the Linux instance is rebooted. If it has to be started automatically on boot/reboot use the below command
chkconfig httpd on
6. Go to the /var/www/html folder and create an index.html file using the below commands
cd /var/www/html
echo "Welcome to thecloudavenue.com" > index.html
7. Get the ip address of the Linux instance from the EC2 management console.

8. Open the same in the browser to get the web page as shown below.

The above sequence of steps will simply install a WebServer on the Linux instance and put a simple web page in it. Much more interesting things can be done. One thing to note is that all the above commands were executed as root, which is not a really good a good practice, but was done for the sake of simplicity.

Friday, April 7, 2017

Creating a Windows EC2 and logging into it

In the previous blog, we looked at creating a Linux EC2 instance and logging into it. This time it would be a Windows EC2 instance. The steps are more or less the same with some minor changes here and there. I will highlight the changes in this blog, so I would recommend going through the blog where we created a Linux instance and come back to this blog.

1. Login to the EC2 management console. Create a Key Pair, if you haven't already done as shown here. The same Key Pair can be used for Linux and Windows instance. There is no need to create two different Key Pairs. And also, there is no need to convert the pem file into a ppk file for logging into a Windows instance.

2. Create a Security Group as shown here. Instead of opening port 22 for ssh, open port 3389 as shown below.


3. Click on `Instances` in the left pane and click on `Launch Instances`.

4. Select the Windows AMI as shown below.


5. Select the EC2 instance type as shown below.


 6. Click on `Next : Configure Instance Details`.

7. Click on `Next : Add Storage`. Note that in the case of Linux instance the storage defaults to 8GB, but in the case of Windows it's 30GB. Windows eats lot of space.

8.Click on `Next : Add Tags`.

9. Click on `Next : Configure Security Group`. Click on `Select an existing security group` and select the Security Group which has been created for the Windows instance.

10. Click on `Review and Launch`.

11. Make sure all the settings are proper and click on `Launch`.

12. Select the Key Pair which has been created earlier and click the `I acknowledge .....` check box. Finally, click on `Launch Instances`.

13. Click on `View Instances`. In a couple of minutes, the Instance State should change to running as shown below.


14. Make sure that the instance is selected and click on the `Connect Button` to download the `Remote Desktop File`. Save it somewhere, where you can find it easily.


15. Click on the `Get Password` button. Click on `Browse` and point to the pem file which was generated during the Key Pair creation. Click on `Decrypt Password`.

16. A random password is generated and displayed as shown below. Note down the password.


17. Double Click on the `Remote Desktop File` which was created in Step 14. Click on `Connect` when prompted with a warning.

18. Enter the password which we got in Step 16 and click on OK. Click on `Yes` when prompted with a warning.


19. Now, we are connected to the Windows EC2 instance in the AWS cloud.


20. Make sure to shutdown the Windows instance and terminate the EC2 instance from the AWS EC2 console to stop the billing.

Similarly, we would be able to start multiple Linux and Windows instances based on our Non Functional Requirements (NFR). Instead of creating the instances manually, Auto Scaling can be used. In Auto Scaling, we can specify conditions when the number of instances should scale up or scale down. Like, if CPU > 80% then add 2 Linux instances, if CPU < 30% then remove 2 Linux instances. Here we specify CPU, but a lot of other metrics can used.

AWS is fun, this is just the beginning and we will look into AWS in the upcoming blogs.

Tuesday, April 4, 2017

Useful resources for AWS

AWS provides one of the best resources I have ever seen. These might be documentation, webinars, YouTube channels, blogs. This is not without a reason, one of the reason is below.


Anyway, here are few of the resources I found very useful

1) Blogs

https://aws.amazon.com/blogs/aws/

If you see on the right there are a few more specific blogs.

2) YouTube channels

AWS - https://www.youtube.com/channel/UCd6MoB9NC6uYN2grvUNT-Zg

AWS Webinars - https://www.youtube.com/channel/UCT-nPlVzJI-ccQXlxjSvJmw

3) Documentation

https://aws.amazon.com/documentation/

https://aws.amazon.com/faqs/

There are good number of AWS blogs and it's difficult to follow them manually for any new updates. So, I use a combination of Feedly and Pocket to keep myself updated on the latest. Both of them have free and paid versions. I had been using the free versions for quite some time and am really happy with them.

If you guys come across any more useful resources around AWS, please let me know in the comments and I will update them in this this blog.

Saturday, April 1, 2017

Creating a Linux EC2 instance and logging into it

Now that we know how to create a Key Pair  and a Security Group, we will create a Linux EC2 instance and then log into it. In the future blogs, we will look into deploying applications in the Linux EC2 instance.

1) First step is to go to the EC2 management console as mentioned in the previous blog. Click on the instances link in the left pane. If you are using AWS for the first time, there shouldn't be any instances as shown below.


2) Click on the `Launch Instance` button and select the AMI. Amazon Machine Image (AMI) is a template for the OS, Applications, Configurations etc. More about the AMI here. There are free and paid versions of the AMI. In fact, it's also possible to create an AMI and share it with others for free or at a cost, which is a topic for another blog. For now, we will select the Amazon Linux AMI.


3) Now, we can select the EC2 instance type. We will pick t2.micro, which is eligible for the free tier. There are a lot of instance types and based on the requirements, we can choose an appropriate one. Here is a deep dive on how to pick the right size of the instance. t2.micro are burstable instances, more here.


4) Click on `Next Configure Instance Details`. The default options should be good enough. But, you can explore the different options. Hover on the i label with a circle to get more information about a particular option.

5) Click on `Next : Add Storage`. Here also the default options are good enough to start with. But, keep exploring the different options. The EC2 AMI which we picked will be attached with a 8GB hard disk. The size of the disk can be increased or more disks can be added. As mentioned leave the option as is.

6) Click on `Next : Add Tags`. Here is where we can categorize the different AWS resources like production/development/testing or accounts/sales/hr. More about tagging here.

7) Click on `Next : Configure Security Group` and select the SG which has been created in the previous blog.


8) Click on `Review and Launch`.


9) Review the details and click on `Launch`.

10) Select the Key Pair which has been created previously and accepting the acknowledgment.


11) Click on `Launch Instances`.

12) Click on `View Instances` at the bottom of the screen.

13) The EC2 will be in a pending state as shown below.


14) After a few seconds, the instance state will change into running as shown below. This means the instance is ready and we should be able to login to the instance now.


15) Note the ec2 ip or the dns name in the same screen.


16) Download putty.exe and launch it. There is no need to install it. Enter the user name and the ip address as shown below.


17) In the putty pane, expand Connection -> SSH -> Auth. Browse to the ppk file which has been created earlier.


 18) Click on `Open`. There will be a putty security alert as shown below. Simply accept it.


19) Now, we should be able to login to the EC2 Linux instance from windows.


20) The best practice is to update the OS with the latest patches. Run the `sudo yum update` command with the quotes. Accept when asked for the confirmation.

21) In the future blogs, we will look into deploying applications on the instance. For now come of the instance by saying exit.

22) The `t2.micro` instance which we create falls under the AWS free tier. Once we are done with the instance, make sure the instance is shut down or else after the AWS free tier it will be charged.

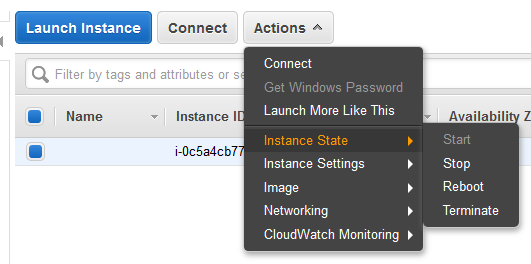
23) Select the instance. Click on Actions -> Instance State -> Terminate.
24) Confirm that you want to terminate.


25) After some time the status of the ec2 instance will become terminated.


Note how easy it is to start a instance in the cloud. Without the cloud, first we have to do the capacity planning, get the approval, send the invoice and procure, get the physical space, cooling, network security, physical security and a lot of other things before we get started with deploying the applications. This is the beauty of the cloud, provisioning instantly.

We can start as many instances as we want and shutdown when we don't need them. This is called elasticity. The good thing is we pay for what we use and nothing more.

In the next blog, we will start a Windows EC2 instance and log into it. Hope you guys are having fun with AWS. There is lot more to it, which we will explore in the upcoming blogs.