There are many ways of installing K8S as mentioned here. It can be installed in the Cloud, on-premise and also locally on the laptop using virtualization. But, installing K8S had never been easy. In this blog, we will look at one of the easiest way to get started with K8S using Play with Kubernetes (PWK). With this the whole K8S experience is within the browser and there is nothing to install on the laptop, everything is installed on the remote machine. PWK uses 'Docker in Docker' which is detailed here (1, 2).
Step 1: Go to https://labs.play-with-k8s.com/, Login and click on Start. A Docker or a Git login would be required for the same.


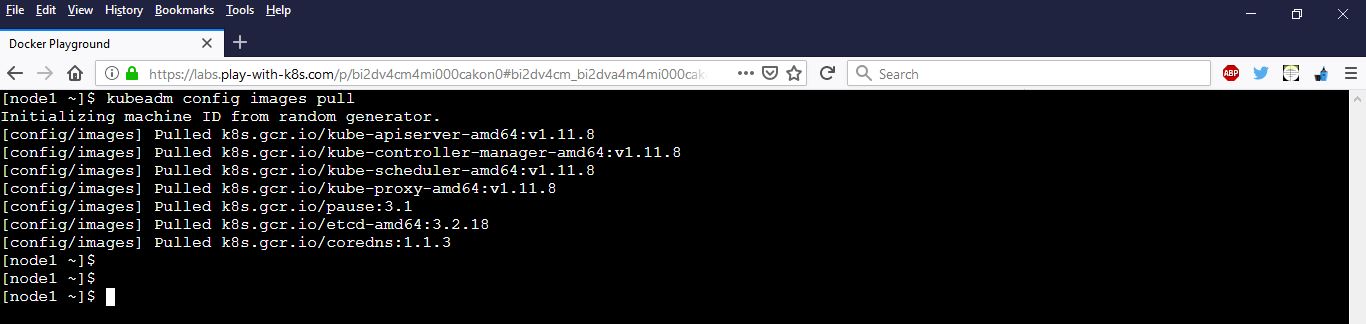
Step 3: Run 'kubeadm config images pull' command on node1. This will pull all the images required for the installation before the actual installation starts in the next step. This is an optional step, but this step makes the installation faster.

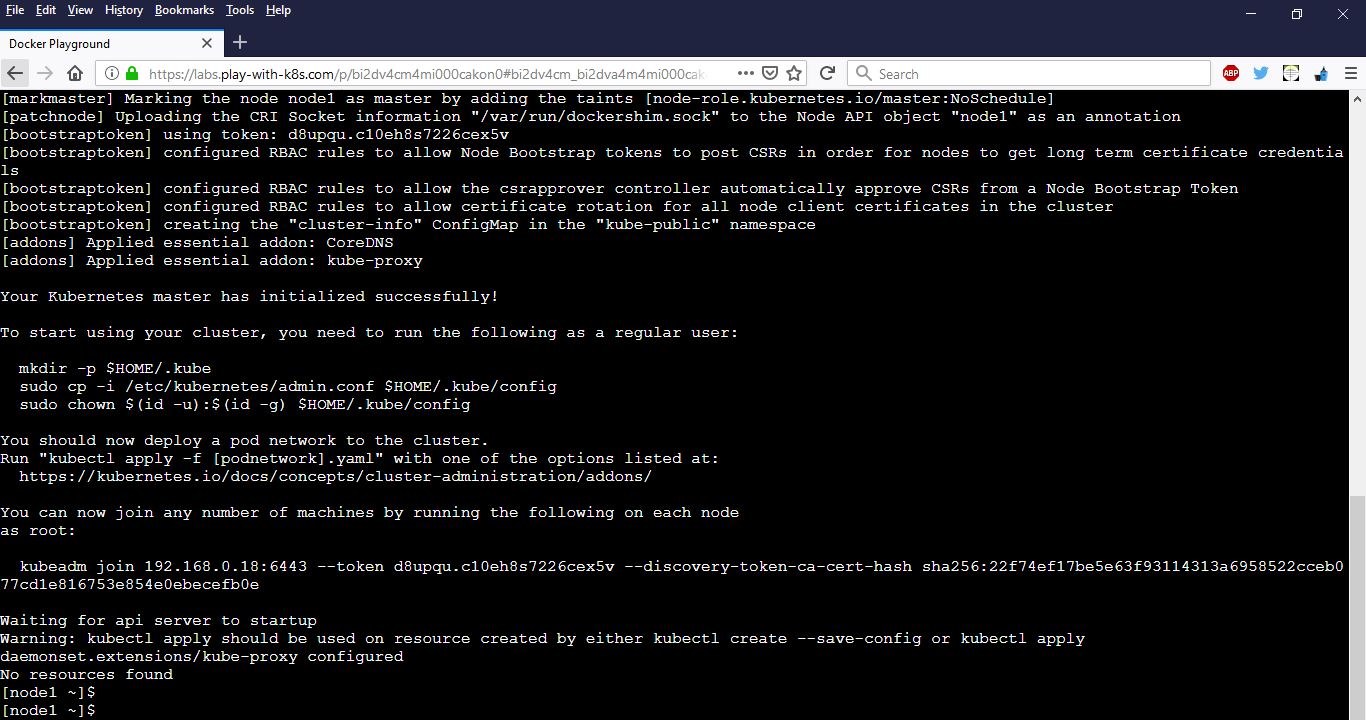
Step 4: Init the master on node1 using the 'kubeadm init --apiserver-advertise-address $(hostname -i)' command. The output of the command should be as shown below. Note down the 'kubeadm join .....' command from the output of this command.


Step 5: Now is the time to deploy the Pod network using the below command on node1.
kubectl apply -n kube-system -f "https://cloud.weave.works/k8s/net?k8s-version=$(kubectl version | base64 |tr -d '\n')"

Step 6: Execute the 'kubeadm join ......' command on all the workers (node2, node3, node4 and node5). On each of the node the 'This node has joined the cluster' will be displayed towards the end of the output. The 'kubeadm join ......' command has been got from Step 4.


Step 7: After a few minutes run 'kubectl get nodes' on the master node (node1) and all the nodes should be in a Ready status. This makes sure that out 5 node K8S cluster is ready.

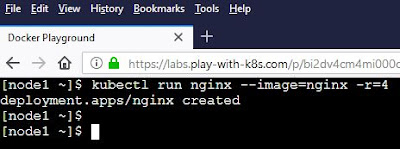
Step 8: Lets create a K8S Deployment with 4 replicas on the nginx server by running 'kubectl run nginx --image=nginx -r=4' on the master node (node1). Initially the status of the Containers will be in 'Container Creating. But, in a few seconds it will change to Running.

Step 9: Get the detailed status of the Pods using 'kubectl get pods -o wide' command. This sill show that the Pods are balanced across all the nodes.
The K8S Deployment objects maintains a fixed number of Pods. Delete one of the Pod using 'kubectl delete pod NAME-OF-THE-POD'. Notice that the Pod will be deleted and a new Pod is automatically created. This can be observed by running the 'kubectl get pods -o wide' command again. The name of the deleted Pod will be changed.

The K8S session would be available for 4 hours. And also any resources/setting done will be lost after the session. The changes to the cluster won't be persisted. Likewise there are a few disadvantages of using PWK, but the good thing is it's free and requires no installation on the local machine.
In the upcoming blogs, we will try to explore the other ways of installing K8S. Also, check Katakoda. It offers K8S in the browser similar to PWK.
Step 1: Go to https://labs.play-with-k8s.com/, Login and click on Start. A Docker or a Git login would be required for the same.

Step 2: PWK allows up to 5 nodes or machines. Click on 'ADD NEW INSTANCE' for 5 times and this will add 5 instances as shown below from node1 to node5. Here we will configure node1 as master and the remaining as workers.
Clicking on a node in the left pane will give access to the corresponding terminal in the bottom right pane. The combination 'Alt+Enter' will maximize the terminal.


Step 3: Run 'kubeadm config images pull' command on node1. This will pull all the images required for the installation before the actual installation starts in the next step. This is an optional step, but this step makes the installation faster.
Step 4: Init the master on node1 using the 'kubeadm init --apiserver-advertise-address $(hostname -i)' command. The output of the command should be as shown below. Note down the 'kubeadm join .....' command from the output of this command.
Step 5: Now is the time to deploy the Pod network using the below command on node1.
kubectl apply -n kube-system -f "https://cloud.weave.works/k8s/net?k8s-version=$(kubectl version | base64 |tr -d '\n')"
Step 6: Execute the 'kubeadm join ......' command on all the workers (node2, node3, node4 and node5). On each of the node the 'This node has joined the cluster' will be displayed towards the end of the output. The 'kubeadm join ......' command has been got from Step 4.

Step 7: After a few minutes run 'kubectl get nodes' on the master node (node1) and all the nodes should be in a Ready status. This makes sure that out 5 node K8S cluster is ready.

Step 8: Lets create a K8S Deployment with 4 replicas on the nginx server by running 'kubectl run nginx --image=nginx -r=4' on the master node (node1). Initially the status of the Containers will be in 'Container Creating. But, in a few seconds it will change to Running.


Step 9: Get the detailed status of the Pods using 'kubectl get pods -o wide' command. This sill show that the Pods are balanced across all the nodes.
The K8S Deployment objects maintains a fixed number of Pods. Delete one of the Pod using 'kubectl delete pod NAME-OF-THE-POD'. Notice that the Pod will be deleted and a new Pod is automatically created. This can be observed by running the 'kubectl get pods -o wide' command again. The name of the deleted Pod will be changed.

The K8S session would be available for 4 hours. And also any resources/setting done will be lost after the session. The changes to the cluster won't be persisted. Likewise there are a few disadvantages of using PWK, but the good thing is it's free and requires no installation on the local machine.
In the upcoming blogs, we will try to explore the other ways of installing K8S. Also, check Katakoda. It offers K8S in the browser similar to PWK.
No comments:
Post a Comment