AWS provides different ways of running K8S in the Cloud via EKS, ECS and with/without Fargate. These are production ready setups for deploying K8S applications. In this blog we would look at microk8s, one of the most easiest way to get started with K8S. Here the assumption is that you already know how to create an EC2 instance and login to it.
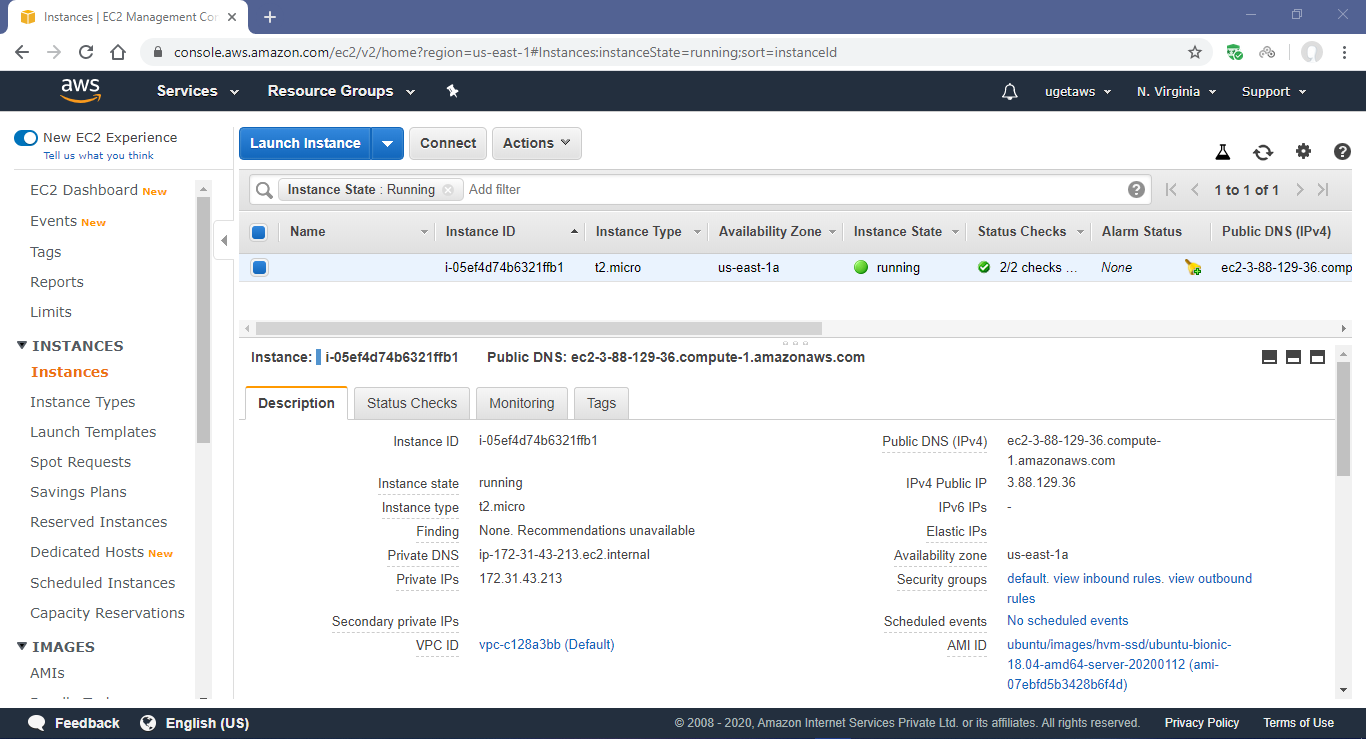
-- Create an Ubuntu EC2 t2.micro instance with the default Security Groups. This Security Group allows all the traffic inbound and outbound. This is OK non-production purpose. Usually depending on the core services, add-ons installed the appropriate ports have to be opened in the Security Group.

-- Login to the EC2 via Putty or some other SSH client and execute the below commands.
#Install the microk8s. The latest release can be got from here.
sudo snap install microk8s --classic --channel=1.18/stable
#Create an alias in the .bashrc file
alias kubectl='microk8s kubectl'
#Add the user part of the microk8s group and change the ownership of the ~/.kube
#Exit and login back into the EC2 for these changes to take place into effect
sudo usermod -a -G microk8s $USER
sudo chown -f -R $USER ~/.kube
#check the status of the microk8s installation
microk8s status --wait-ready
-- Create a file deployment.yaml with the below content. Run 'kubectl create -f deployment.yaml' to create a Deployment with 3 Pods with the nginx Containers. BTW, kubectl is the CLI for interacting with K8S.
apiVersion: apps/v1
kind: Deployment
metadata:
name: nginx-deployment
labels:
app: nginx
spec:
replicas: 3
selector:
matchLabels:
app: nginx
template:
metadata:
labels:
app: nginx
spec:
containers:
- name: nginx
image: nginx:1.14.2
ports:
- containerPort: 80
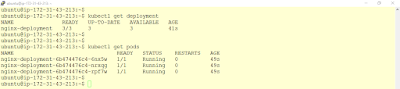
-- 'kubectl get deployments' and 'kubectl get pods' will give the list of deployments and pods created in the above step.
--Now lets try to install the K8S Dashboard, which is a graphical way of interfacing with K8S. Execute the below commands in the EC2.
#Enable the K8S Dashboard
microk8s enable dashboard
#Get the token for the default user
token=$(kubectl -n kube-system get secret | grep default-token | cut -d " " -f1)
kubectl -n kube-system describe secret $token
#Port forward the K8S Dashboard port 443 to port 10443 onto the EC2.
microk8s kubectl port-forward -n kube-system service/kubernetes-dashboard 10443:443 --address 0.0.0.0
-- Now the K8S Dashboard is ready to be accessed.
#Open the below URL in the browser. Note to replace the ec2-ip with the Public IP of the EC2.
#Provide the token got from the previous step
#The Deployments and Pods created earlier can be seen.
https://ec2-ip:10443/


In the above setup a t2.micro instance was used which provides 1 vCPU and 1 GB of RAM. The only reason for using t2.micro is because it falls under the AWS Free Tier. Once the Deployment and Pods are started, the CPU is reaching the peak while some memory left is as shown below. With the t2.micro I have noticed that microk8s behaves a bit slow especially the Dashboard. Try to pickup a bigger instance for trying out various features of K8S.


The above steps are for creating a single node K8S cluster, multi node K8S cluster is also possible with microk8s as mentioned in the documentation here.
Setting up K8S with proper configuration especially for the Production setup is not an easy task. But, microk8s, K3S and Minikube have made it easy to get started with K8S.
Steps for setting up the K8S on EC2 using microk8s
-- Create an Ubuntu EC2 t2.micro instance with the default Security Groups. This Security Group allows all the traffic inbound and outbound. This is OK non-production purpose. Usually depending on the core services, add-ons installed the appropriate ports have to be opened in the Security Group.
-- Login to the EC2 via Putty or some other SSH client and execute the below commands.
#Install the microk8s. The latest release can be got from here.
sudo snap install microk8s --classic --channel=1.18/stable
#Create an alias in the .bashrc file
alias kubectl='microk8s kubectl'
#Add the user part of the microk8s group and change the ownership of the ~/.kube
#Exit and login back into the EC2 for these changes to take place into effect
sudo usermod -a -G microk8s $USER
sudo chown -f -R $USER ~/.kube
#check the status of the microk8s installation
microk8s status --wait-ready
-- Create a file deployment.yaml with the below content. Run 'kubectl create -f deployment.yaml' to create a Deployment with 3 Pods with the nginx Containers. BTW, kubectl is the CLI for interacting with K8S.
apiVersion: apps/v1
kind: Deployment
metadata:
name: nginx-deployment
labels:
app: nginx
spec:
replicas: 3
selector:
matchLabels:
app: nginx
template:
metadata:
labels:
app: nginx
spec:
containers:
- name: nginx
image: nginx:1.14.2
ports:
- containerPort: 80
-- 'kubectl get deployments' and 'kubectl get pods' will give the list of deployments and pods created in the above step.

--Now lets try to install the K8S Dashboard, which is a graphical way of interfacing with K8S. Execute the below commands in the EC2.
#Enable the K8S Dashboard
microk8s enable dashboard
#Get the token for the default user
token=$(kubectl -n kube-system get secret | grep default-token | cut -d " " -f1)
kubectl -n kube-system describe secret $token
#Port forward the K8S Dashboard port 443 to port 10443 onto the EC2.
microk8s kubectl port-forward -n kube-system service/kubernetes-dashboard 10443:443 --address 0.0.0.0
-- Now the K8S Dashboard is ready to be accessed.
#Open the below URL in the browser. Note to replace the ec2-ip with the Public IP of the EC2.
#Provide the token got from the previous step
#The Deployments and Pods created earlier can be seen.
https://ec2-ip:10443/


Conclusion
In the above setup a t2.micro instance was used which provides 1 vCPU and 1 GB of RAM. The only reason for using t2.micro is because it falls under the AWS Free Tier. Once the Deployment and Pods are started, the CPU is reaching the peak while some memory left is as shown below. With the t2.micro I have noticed that microk8s behaves a bit slow especially the Dashboard. Try to pickup a bigger instance for trying out various features of K8S.


The above steps are for creating a single node K8S cluster, multi node K8S cluster is also possible with microk8s as mentioned in the documentation here.
Setting up K8S with proper configuration especially for the Production setup is not an easy task. But, microk8s, K3S and Minikube have made it easy to get started with K8S.
No comments:
Post a Comment