Monday, December 30, 2013

Getting started with Big Data - Part 2 - Installing Ubuntu on top of VirtualBox

In an earlier blog entry we looked into how to install VirtualBox on top of Windows, now it's time to install Ubuntu 12.04 64-bit Desktop which is latest LTS release as of this writing.

The reason for using 64-bit is that 64-bit OS addresses more RAM than a 32-bit OS and that some of the Big Data frameworks like Impala can be only deployed on a 64-bit OS. An Ubuntu Server edition could have been used instead of a Ubuntu Desktop edition, but the Desktop edition provides a nice UI (defaults to Unity) which makes it easy for those who want to get started with Linux.

- The first step is to download Ubuntu 12.04 and not the point release 12.04.3. There are some problems installing the Ubuntu 12.04.3 point release as mentioned here. The `ubuntu-12.04-desktop-amd64.iso` image can be downloaded from here or one of the alternate sites.

The md5 hash of the image is `128f0c16f4734c420b0185a492d92e52` which can be got once the iso file has been downloaded. Here is how to get the md5 hash for different OS. The md5 hash makes sure that the iso file which has been downloaded is not corrupted or tampered with.

- Start the VirtualBox and click on the `New` on top left.
Screen 1

- Give the VM a name and select `Linux` as the type and `Ubuntu (64-bit)` as the version.
Screen 2

Watermarking images using Phatch

I am a big fan of automating things and Ubuntu (or Linux) gives me more and more opportunities for the same. It makes me content automating mundane tasks and am willing to spend time to get it done.

Recently, I was looking on how to watermark the images on this blog and was exploring not only how to watermark, but also how to automate the process given a bunch of images. Started exploring GIMP Script-Fu which is similar to Excel Macros to automate tasks. But, given a simple task like watermarking, it was more of a big bite to learn a new language Script-Fu.

After a bit of googling, finally found Phatch. Initially, was not sure what Phatch means, but found it is a sort of acronym for PHoto & bATCH. Actions can be created using Phatch UI and can be chained together as shown below. The work-flow definition will be automatically generated as shown in this file.
The workflow gets all the images in a particular folder, applies the specified watermark to each of the image and finally stores the images in a `wm` folder. Note the below image is with a watermark at the bottom right.
Phatch can also be run from the command line as below specifying the phatch file which contains the work-flow definition and the location of the images which needs to be watermarked.
phatch wm.phatch /home/praveensripati/images/
There are a lot of obscure softwares like these for Linux which are far more better than the windows counterpart. It's all a matter finding them. Would be blogging about more productivity softwares/tools like these in the future blogs.

One of the reason many say for not moving to the Linux OS is the availability of the softwares, but this is far from true. Ubuntu repository has a lot of softwares and only some of them are installed by default during the installation process. Synaptic Package Manager which is a front-end to apt-get can be used to manage the softwares in Ubuntu. So, given a task to accomplish, it's a matter of picking the appropriate software.

More and more games are also getting into the Linux platform, so it's not a bad bet after all :)

Saturday, December 28, 2013

Getting started with Big Data - Part 1 - Installing VirtualBox on a Windows Machine

If not all, most (1, 2 etc) of the Big Data frameworks get built for Linux platforms and then later some of them are migrated to the Windows platform as a second thought. It's not something new, but Microsoft has partnered with HortonWorks to make sure that Hadoop and other Big Data frameworks work smoothly on the Windows platform. Microsoft had Dryad which is a distributed computing platform which had been abandoned for Hadoop. Not only Hadoop is being ported to Windows as HDP, but one can also expect tight integration with other Windows services/softwares.
linux_not_windows by nslookup on flickr
There are a number of factors which decide to go for Big Data/Windows or Big Data/Linux platform. Even when going for Big Data/Windows, it makes sense to have a Big Data/Linux for the development environment from a cost perspective. It's more or less the same as developing JEE applications JBoss (ok ok - WildFly) and then migrating them to other proprietary application platforms like IBM WAS. Although, it comes with a cost saving to do the development on Linux machines, there might be an additional effort which might have to be incurred to take into the fact that there are some (or a lot of) environment differences between Big Data/Windows or Big Data/Linux platforms. Also, any extensions provided in one platform cannot be developed/tested on the other platform.

As mentioned above, most of the Big Data frameworks get built on Linux and then ported to Windows platform. And it's really important to get initially familiar and then finally comfortable with Linux to deep dive into the Big Data space. Most of us are have worked on and comfortable with Windows, but it's  rare or less common to see someone who uses Linux on a day to day basis unless someone is working in IT or has been forced to use Linux by mass migrating from Windows to Linux.

One of the main reason for the hindrance to adopt Linux is the fear that installation of Linux might mess with the existing Windows installation. But, Linux has come long way and it has been no more easier installing and using Linux. There are more than 100 flavors of Linux to pick and choose from.

In this blog we will look into how to install VirtualBox on a Windows machine and with upcoming blogs on how to install Ubuntu and finally Apache Bigtop (which makes it easy to get started with a lot of Big Data frameworks easy) on top of Ubuntu. VirtualBox and other virtualization softwares like VMWare allow to run one OS on top of another OS or run multiple OS directly on the virtualization software.

Friday, December 27, 2013

Different kernel versions between Ubuntu 12.04 and 12.04.3 (point release)

`Ubuntu Tux floats` to work by danoz2k9 on flickr
Ubuntu not only provides a very usable flavor of Linux, but a very easy to remember naming convention (try to remember for Windows). This blog is being authored from Ubuntu 12.04 (Precise Pangolin), where 12 corresponds to the year 2012 and 04 corresponds to the month April when that particular version of Ubuntu has been released.

Ubuntu releases a new version every 6 months. So, after the 12.04 release there had been 12.10, 13.04 and 13.10 releases. Every fourth releases (10.04, 12.04, 14.04 etc) is a LTS (Long Term Support) and is supported for 5 years, while the non LTS releases are supported for only 9 months. This is the reason for sticking to the Ubuntu 12.04 release, because it is supported for 5 years and there is no need to upgrade the OS again and again till 2017.

The main disadvantage of sticking to an old release is that within a particular release Ubuntu usually provides security/stability updates, but not any updates with new features. For example, Ubuntu 12.04 comes with R (2.14.1) while the latest is R (3.0.2). Software can be upgraded to the latest version in Ubuntu by adding repositories and installing the softwares.

Similar to Service Packs in Windows, Ubuntu also provides point releases.
According to Mark Shuttleworth :

These point releases will include support for new hardware as well as rolling up all the updates published in that series to date. So a fresh install of a point release will work on newer hardware and will also not require a big download of additional updates.

As some of you might noticed from the blog, I use Ubuntu a lot for trying out different things around Big Data and create Ubuntu Virtual Machines quite often as shown below. In-fact, I keep a copy of the pristine Ubuntu 12.04 image which will not only help to avoid the installation steps, but will also help in brining a Guest OS ASAP.
Recently on creating an Guest OS using Ubuntu 12.04.3 (note the point release), it was observed that there was a kernel version mismatch between the Host (Ubuntu 12.04 - 3.2.0-53-generic) and Guest (Ubuntu 12.04.3 - 3.8.0-34-generic) in-spite of doing an upgrade on both of them multiple times. The kernel version can be found out using the `uname -r` command.

Installing the VirtualBox the Guest Additions on the Guest not only provides a better performance in the Guest, but also a better integration (shared folders, full screen, shared clipboard etc) between the Host and the Guest OS. But, because the Guest OS was using an updated version of the kernel (3.8.0-34-generic), there were some conflicts because of which the Guest Additions were not getting installed.

After installing Ubuntu 12.04 (not the point release) as the Guest OS and updating the packages, the VirtualBox Guest Additions were installed properly. It looks like for better Hardware support Ubuntu point release come with a different or a more updated kernel as part of the LTS Enablement Stacks. More about this here.

Thursday, December 26, 2013

Store and ETL Big Data in the Cloud with Apache Hive

Big Data and cloud storage paired with the processing capabilities of Apache Hadoop and Hive as a service can be an excellent complement to expensive data warehouses. The ever-increasing storage demands of big data applications put pressure on in-house storage solutions. This data is generally not stored in database systems because of its size. In fact, it is commonly the precursor to a data mining or aggregation process, which writes the distilled information into a database. However, for this process the constantly growing data collected from logs, transactions, sensors, or others has to be stored somewhere, inexpensively, safely, and accessibly.

Cloud Storage

Most companies can achieve two of the three attributes, e.g. safe and inexpensive (tapes) or safe and accessible (multi-location, data servers), or inexpensive and accessible (non-redundant server or network attached drive). The combination of the three requires economies of scale beyond most company's ability and feasibility for their data. Cloud providers like Amazon Web Services have taken on the challenge and offer excellent solutions like Amazon S3. It provides a virtually limitless data sink with a tremendous safety (99.999999999% durability), instant access, and reasonable pricing.

Utilizing Cloud Data

Scenarios for big data in the cloud consequently should consider S3 as a data sink to collect data in a single point. Once collected the data has to be processed. One option is to write custom software to load the data, parse it, and aggregate and export the information contained in it to another storage format or data store. This common ETL (Extract, Transform, Load) processing is encountered in data warehouses situations. So reinventing the wheel by developing a custom solution is not desirable. At the same time building or scaling a data warehouse for Big Data is an expensive proposition.

There is an alternative, which can ETL Giga-, Tera- and Petabytes of data with low information density cheaply and with mature tools to simplify the design and management of the ETL jobs. This is the domain of Apache Hadoop and Hive.

Accessing Cloud Data with Hive

Apache Hive offers a SQL-like interface to data stored on Hadoop's HDFS or Amazon S3. It does this by mapping data formats to tables and associating a directory with a table. We can then execute SQL-like queries against this data. Hive turns the queries into map reduce jobs for Hadoop to execute. Hadoop will read all the files in the directory, parsed based on the table definition, and the extracted data to process it according to the query.

A very simple example is a comma-separated file stored on S3:
1,10.34,Flux Capacitor,\N
2,5.00,Head phone,ACME Corp.
The '\N' is a Hive specific encoding and is read by Hive as NULL. An empty string would be read exactly as an empty string and not NULL.

A table definition in Hive to utilise this data would be:
CREATE EXTERNAL TABLE products(
    id INT,
    price DECIMAL,
    name STRING,
    manufacturer STRING)
ROW FORMAT DELIMITED FIELDS TERMINATED BY ','
STORED AS TEXTFILE
LOCATION 's3n://your_bucket/some_where/';

Tuesday, December 17, 2013

Imapala vs Hive performance on Amazon AWS EMR

Apache Hive and Impala provide a SQL layer on top of the data in HDFS. Hive converts the SQL query into a MR plan and submits it to the Hadoop cluster for execution, while the Impala daemons directly process the data in HDFS. In an earlier blog we looked into when to use Hive and when Impala. Also, as mentioned in an earlier blog, both of them can use a common metastore, so any tables created in Hive would be visible in Impala and vice versa.
Hive on AWS EMR had been there for some time, but recently Impala has been added to the list. In this blog, we will compare the performance of Impala vs Hive on Amazon EMR using the same hardware (m1.large for master and m1.large for the slave) on the same data set. Note that a lot of improvements are in progress for both Hive and Impala and also EMR is using the latest versions of Hive and Impala as of now.

So, here are the steps at a high level:

- Launch a EMR cluster with Impala and Hive on AWS.
- ssh to the master and create some data.
- Create some tables using Impala shell and map it to the above data.
- Run the same queries on Hive and Impala to measure the performance.

And here are the steps in detail :

- Create the KeyPairs from the EC2 Management Console and the Access Keys (Access Key ID and Secret Access Key) in the IAM Management Console as mentioned here. While creating the KeyPairs the user will be prompted to store a pem file, which will be used to login to the master.

Monday, December 16, 2013

What's behind StackOverflow?

Some of us had been actively looking for help in StackOverflow and some actively helping others. Anyway, for those who had been working on any Technology, StackOverflow and the related sites have been a must-have. I know a couple of techie guys who have shifted to using StackOverflow from various mailing forums and other venues.

StackOverflow and a bunch of sites fall under the StackExchange umbrella. Here are the interesting details about the infrastructure and metrics behind the StackExchange. Thanks to the incredible team behind it to make it happen !!!

Friday, December 13, 2013

Unit Testing MapReduce with MRUnit framework

http://www.breconbeacons.org/12things/llangorse-lake
Distributed computing model programs like MapReduce are difficult to debug, so it's better to find and fix the bugs in the early stages of development. In an earlier post we looked into debugging a MapReduce in Eclipse and here we looked at unit testing Hadoop R Streaming programs. In this blog entry, we will look into how to unit test MapReduce programs using Apache MRUnit. In either case there is no need start HDFS and MR related daemons.

MRUnit is a Apache Top Level project and had been there for some time, but is not in the lime light and doesn't get much attention as the case of other projects, but is equally important to get the proper product out in time.

So here are steps:

- Download the below mentioned jar files.

mrunit-1.0.0-hadoop1.jar from http://www.apache.org/dyn/closer.cgi/mrunit
mockito-all-1.9.5.jar from http://code.google.com/p/mockito/
junit-4.11.jar from http://junit.org/

- Copy the hadoop-core-1.2.1.jar, commons-cli-1.2.jar and commons-logging-1.1.1.jar files from the Hadoop installation folder into Eclipse and include them in the project dependencies.

- Create a project in Eclipse and add the above mentioned libraries as dependencies.

Tuesday, December 10, 2013

Running a custom MR job on Amazon EMR

In an earlier blog entry we looked at how to start an EMR cluster and submit the predefined WordCount example MR job. This blog details the steps required to submit a user defined MR job to Amazon. We will also look into how to open an ssh tunnel to the cluster master to get the access to the MR and HDFS consoles.

In Amazon EMR, there are three types of nodes. The master node, core node (for task execution and storage) and task node (for execution). We would be creating a master node, push the word count code to it, compile it, create a jar file, push the jar and data file to S3, then finally execute the MR program in the jar file. Note that the data can be in HDFS also.

- As described in the previous blog entry, the first steps is to create the `key pairs` from the EC2 management console and store the pem key file for later logging into the master node. Next create the Access Keys (Access Key ID and the Secret Access Key) in the IAM Management Console.

- Go to the S3 management console and create a bucket `thecloudavenue-mroutput`. Note that the bucket name should be unique, so create some thing else. But, this entry will refer to bucket as `thecloudavenue-mroutput`.

- Go to the EMR management console create a cluster. We would be creating a master node and not run any steps as of now.

- Give a name to the cluster and specify the logs folder location in S3. For some reason the logs are getting shown in S3 with a delay, so it had been a bit difficult to debug the MR jobs.

Friday, December 6, 2013

How to use the content of this blog?

As some of you have noticed, I have been blogging for the last 2 years about Big Data, Hadoop and related technologies. The blog was created with an intension to help those who wanted to get started with Big Data. There are a lot of interesting things happening in the Big Data space and I plan to keep blogging about them.

Some of the articles are precise and small, but it takes a lot of effort to get a grip on a subject and to express them in this blog. It's fun blogging and I would definitely encourage others to express themselves through blogging about the topic of their interest, not necessarily technology related.


There are not too many restrictions on how to use the contents of the blog. But, if you plan to use the content as-is or with minor modification else where like in another blog, I would really appreciate if a reference to the original content is made at the top as `This article originally appeared in ......".


Wednesday, December 4, 2013

New Virtual Machine to get started with Big Data

We offer a Virtual Machine (VM) for those interested in the Big Data training to get started easily. More details about the VM here. The VM avoids the burden of installing/configuring/integrating different Big Data frameworks on the developer. The VM can be easily installed on a Windows/Mac/Linux machine once it has been downloaded. Along with the VM, documentation with the instructions on how to use those different frameworks will also be provided.

The original VM had been created almost an year back and contained some outdated frameworks. So, we created a new VM for those who wanted to dive into the exciting world of Big Data and related technologies.

The old VM already had Hadoop, Hive, Pig, HBase, Cassandra, Flume, ZooKeeper which have been upgraded with the latest releases from Apache. The new VM has been built using Ubuntu 12.04 64-bit with the below mentioned  frameworks newly included.

- Oozie (for creating work flows and schedulers)
- Storm (for performing real time processing)
- Neo4J (for storing and retrieving graphs)
- Hadoop 2x (for executing MR on YARN)
- Phoenix (for SQL on top of HBase)
- rmr2 and rhdfs (for quickly developing MR in R)

Because of using FOSS, there is no limitation on how long the VM can be used. For more information about the Big Data Virtual Machine and the training, please send an email to praveensripati@gmail.com

Tuesday, December 3, 2013

Getting started with Amazon EMR executing WordCount MR program

In an earlier blog entry, we looked into how easy it was to setup a CDH cluster on Amazon AWS. This blog entry will look into how to use Amazon EMR which is even more easier to get started with Hadoop. Amazon EMR is an PAAS (Platform As A Service) in which Hadoop is already installed/configured/tuned on which applications (MR, Pig, Hive etc) can be built and run.

We will submit a simple WordCount MapReduce program that comes with EMR. AWS has one of the best documentation, but there are some steps missing, this entry will try to fill them and add more details to it. The whole exercise takes less than 0.5 USD, so it should not be much much of a strain to the pocket.

Amazon makes it easy to get started with Hadoop and related technologies. All needed is a Credit Card to fork the money. The good thing is that Amazon has been slashing prices making it more and more affordable to everyone. The barrier to implement a new idea is getting low day by day.

So, here are the steps

- Create an account with AWS here and provide the Credit Card and other details.

- The next step is to goto the EC2 management console and create a Key Pair.
Download the pem file, it will be used along with ssh to login to the Hadoop nodes which we would be creating soon. To create an SSH tunnel to the Hadoop Master node, the same pem file would be required.

Wednesday, November 27, 2013

Installing and configuring Storm on Ubuntu 12.04

 
In this blog althrough we had been exploring different frameworks like Hadoop, Pig, Hive and others which are batch oriented (some call it long time similar to real time). So, based on the size of the data and the cluster it might take a couple of hours to process the data.

Above mentioned frameworks might not meet all the user requirement. Lets take the use case of a Credit Card or an Insurance company, they would like to detect frauds happening as soon as possible to minimize the effects of frauds. This is where frameworks like Apache Storm, LinkedIn Samza, Amazon Kinesis help to fill the gap.

A social analytics company called BackType acquired by Twitter developed Storm. Twitter later released the code for Storm. This Twitter blog makes a good introduction to Storm architecture. Instead of the repeating the same here, we will look into how to install and configure on Apache Storm on a single node. It took me a couple of hours to figure it out, so this blog entry to make it easy for others to get started with Storm. 1, 2 had been really helpful to figure it out. Note that Storm has been submitted to the Apache Software Foundation and is in the Incubator phase.

Here are steps from 10k feet

- Download the binaries, Install and Configure - ZooKeeper.
- Download the code, build, install - zeromq and jzmq.
- Download the binaries, Install and Configure - Storm.
- Download the sample Storm code, build and execute them.

Here are the steps in detail. No need to install Hadoop etc, Storm works independent of Hadoop. Note that these steps have been tried on Ubuntu 12.04 and might change a bit with other OS.

Monday, November 25, 2013

Installing/configuring HCatalog and integrating with Pig

As mentioned in the previous blog entry, Hive uses a metastore to store the table details, mapping of the table to the data and other details. Any framework which provides an SQL like interface would require a metastore similar to Hive. Instead of having a separate incompatible metastore for each of these framework, it would be good to have a common metastore across them.This is where HCatalog comes into the picture.
This way the data structures created by one frameworks would be visible to others. Also, by using a common metastore a data analysts can more concentrate on the analytics part than on the location/format of the data.

Using open source is really nice, but sometimes the documentation lacks details and when it comes to integrating different frameworks it lacks even more and there are also the compatibility issues between the different frameworks. So, this entry is about how to install/configure HCatalog and how to integrate it with Pig. This way Pig and Hive will have a unified metadata view. Anyway, here is the documentation for HCatalog.

Saturday, November 23, 2013

Imapla or Hive - when to use what?

Hive has been initially developed by Facebook and later released to the Apache Software Foundation. Here is a paper from Facebook on the same. Impala from Cloudera is based on the Google Dremel paper. Both, Impala and Hive provide a SQL type of abstraction for data analytics for data on on top of HDFS and use the Hive metastore. So, when to use Hive and when to use Impala?

Here is a discussion on Quora on the same. Here is a snippet from the Cloudera Impala FAQ

Impala is well-suited to executing SQL queries for interactive exploratory analytics on large datasets. Hive and MapReduce are appropriate for very long running, batch-oriented tasks such as ETL.

And here is a nice presentation which summarizes to the point about Hive vs Imapala. So, I won't be repeating them again in this blog.


Note that performance is not the only non-functional-requirement for picking a patricular framework. Also, the Big Data had been moving rapidly and the comparison results might trip the other way in the future as more improvements are made to the corresponding framework.

Thursday, November 21, 2013

Different ways of configuring Hive metastore

Apache Hive is a client side library providing a table like abstraction on top of the data in HDFS for data processing. Hive jobs are converted into a MR plan which is then submitted to the Hadoop cluster for execution.

The Hive table definitions and mapping to the data are stored in a metastore. Metastore constitutes of  (1) the meta store service and (2) the database. The metastore service provides the interface to the Hive and the database stores the data definitions, mappings to the data and others.

The metastore (service and database) can be configured in different ways. The default Hive configuration (as is from Apache Hive without any configuration changes) is that Hive driver, metastore interface and the db (derby) all use the same JVM. This configuration is called embedded metastore and is good for the sake of development and unit testing, but won't scale to a production environment as only a single user can connect to the derby database at any instant of time. Starting second instance of the Hive driver will thrown an error back.
Another way to configure is to use an external database which is JDBC compliant like MySQL as shown below. This configuration is called local metastore.
Here are the steps required to configure Hive in an local metastore way.

Tuesday, November 19, 2013

Using Log4J/Flume to log application events into HDFS

Many a times the events from the applications have to be analyzed to know more about the customer behavior for recommendations or to figure any fraudulent use cases. With more data to analyze, it might take a lot of time or some times even not possible to process the events on a single machine. This is where distributed systems like Hadoop and others cuts the requirement.

Apache Flume and Sqoop can be used to move the data from the source to the sink. The main difference is that Flume is event based, while Sqoop is not. Also, Sqoop is used to move data from structures data stores like RDBMS to HDFS and HBase, while Flume supports a variety of sources and sinks.

One of the option is to make the application use Log4J to send the log events to a Flume sink which will store them in HDFS for further analysis.

Here are the steps to configure Flume with the Avro Source, Memory Channel, HDFS Sink and chain them together.

Tuesday, November 12, 2013

Creating a simple coordinator/scheduler using Apache Oozie

With the assumption that Oozie has been installed/configured as mentioned here and that a simple work flow can be executed as mentioned here, now it's time to look at how to schedule the work flow at regular interval using Oozie.

- Create the coordinator.properties file in HDFS (oozie-clickstream-examples/apps/scheduler/coordinator.properties)
nameNode=hdfs://localhost:9000
jobTracker=localhost:9001
queueName=default

examplesRoot=oozie-clickstream-examples
examplesRootDir=/user/${user.name}/${examplesRoot}

oozie.use.system.libpath=true
oozie.coord.application.path=${nameNode}/user/${user.name}/${examplesRoot}/apps/scheduler
- Create the coordinator.xml file in HDFS (oozie-clickstream-examples/apps/scheduler/coordinator.xml). The job runs between the specified start and the end time interval for every 10 minutes.
<coordinator-app name="wf_scheduler" frequency="10" start="2013-10-24T22:08Z" end="2013-10-24T22:12Z" timezone="UTC" xmlns="uri:oozie:coordinator:0.1">
   <action>
      <workflow>
         <app-path>${nameNode}${examplesRootDir}/apps/cs</app-path>
      </workflow>
   </action>
</coordinator-app> 
Note that the Oozie coordinator can be time based or event based with much more complexity than as mentioned here. Here are the specifications for the Oozie coordinator.

- For some reason Oozie is picking 1 hour behind the system time.This can be observed from the `Created` time of the latest submitted work flow and the system time from the top right in the below screen. So, the start and the end time in the previous step had to be backed by an hour to the actual times.
Not sure why this happens, but will update the blog if the cause is found out or someone posts why in the comments.

-Submit the Oozie coordinator job as
bin/oozie job -oozie http://localhost:11000/oozie -config /home/vm4learning/Code/oozie-clickstream-examples/apps/scheduler/coordinator.properties -run
-The coordinator job should appear in the Oozie console from the PREP to RUNNING, all the way to SUCCEEDED state.
- The output should appear as below in the `oozie-clickstream-examples/finaloutput/000000_0` file in HDFS.
www.businessweek.com 2
www.eenadu.net 2
www.stackoverflow.com 2
Note that Oozie has got a concept of bundles where a user can batch a group of coordinator applications and execute an operation on the the whole bunch at a time. Will look into it in another blog entry.

Tuesday, October 29, 2013

Executing an Oozie workflow with Pig, Hive & Sqoop actions

In the earlier blog entries, we have looked into how install Oozie here and how to do the Click Stream analysis using Hive and Pig here. This blog is about executing a simple work flow which imports the User data from MySQL database using Sqoop, pre-processes the Click Stream data using Pig and finally doing some basic analytics on the User and the Click Stream using Hive.

Before running a Hive query, the table/column/column-types have to be defined. Because of this, the data for Hive needs to have some structure. Pig is better for processing semi structured data when compared to Hive. Here is Pig vs Hive at a very high level. Because of the above mentioned reason, one of the use case is that Pig being used for pre-processing (filter out the invalid records, massage the data etc) of the data to make it ready for Hive to consume.
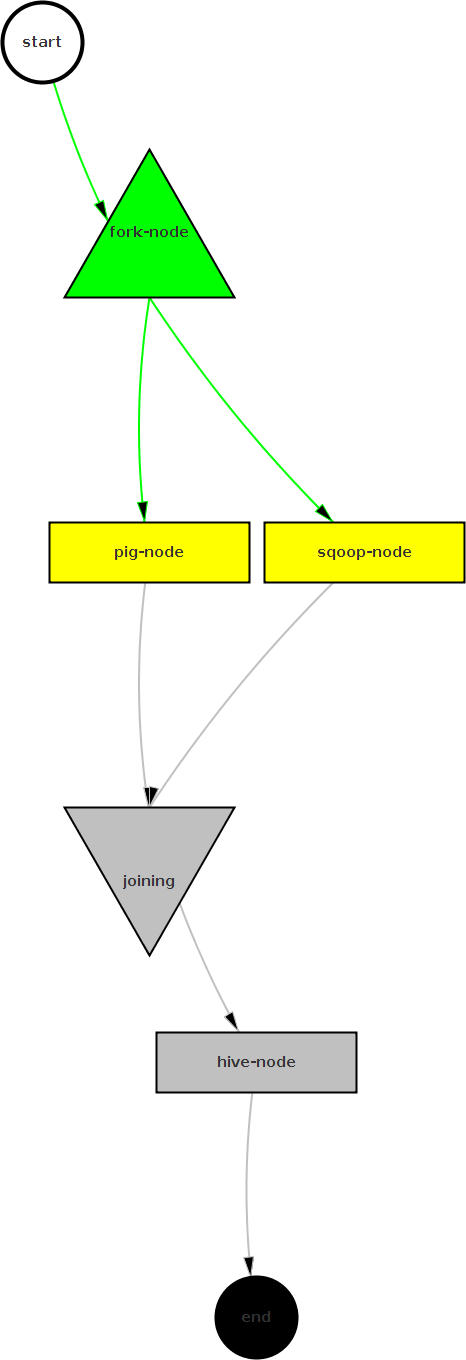
The below DAG was generated by Oozie. The fork will spawn a Pig action (which cleans the Click Stream data) and a Sqoop action (which imports the user data from a MySQL database) in parallel. Once the Pig and the Sqoop actions are done, the Hive action will be started to do the final analytics combining the Click Stream and the User data.
Here are the steps to define the work flow and then execute it. This is with the assumption that  MySQL, Oozie and Hadoop have been installed, configured and work properly. Here are the instructions for installing and configuring Oozie.

- The work flow requires more than 2 map slots in the cluster, so if the work flow is executed on a single node cluster the following has to be included in the `mapred-site.xml`.
<property>
   <name>mapred.tasktracker.map.tasks.maximum</name>
   <value>4</value>
</property>
<property>
   <name>mapred.tasktracker.reduce.tasks.maximum</name>
   <value>4</value>
</property>
- Create the file `oozie-clickstream-examples/input-data/clickstream/clickstream.txt` in HDFS with the below content. Note than the last record is an invalid record which is filtered by Pig when the work flow is executed. The first field is the userId and the second field is the site visited by the user.
1,www.bbc.com
1,www.abc.com
1,www.gmail.com
2,www.cnn.com
2,www.eenadu.net
2,www.stackoverflow.com
2,www.businessweek.com
3,www.eenadu.net
3,www.stackoverflow.com
3,www.businessweek.com
A,www.thecloudavenue.com
- Create a user table in MySQL
CREATE TABLE user (
    user_id INTEGER NOT NULL PRIMARY KEY,
    name CHAR(32) NOT NULL,
    age INTEGER,
    country VARCHAR(32),
    gender CHAR(1)
);
- And insert some data into it
insert into user values (1,"Tom",20,"India","M");
insert into user values (2,"Rick",5,"India","M");
insert into user values (3,"Rachel",15,"India","F");
- Extract the `oozie-4.0.0/oozie-sharelib-4.0.0.tar.gz` file from the Oozie installation folder and copy the mysql-connector-java-*.jar to the `share/lib/sqoop` folder. This jar is required for Sqoop to connect to the MySQL database and get the user data.

- Copy the above mentioned `share` folder into HDFS. Here is the significance of sharelib in Oozie. These are the common libraries which are used across different actions in Oozie.
bin/hadoop fs -put /home/vm4learning/Code/share/ /user/vm4learning/share/

- Create the work flow file in HDFS (oozie-clickstream-examples/apps/cs/workflow.xml). Note that the connect string for the Oozie has to be modified appropriately.
<?xml version="1.0" encoding="UTF-8"?>
<workflow-app xmlns="uri:oozie:workflow:0.2" name="cs-wf-fork-join">
    <start to="fork-node"/>

    <fork name="fork-node">
        <path start="sqoop-node" />
        <path start="pig-node" />
    </fork>

    <action name="sqoop-node">
        <sqoop xmlns="uri:oozie:sqoop-action:0.2">
            <job-tracker>${jobTracker}</job-tracker>
            <name-node>${nameNode}</name-node>
            <prepare>
                <delete path="${nameNode}/${examplesRootDir}/input-data/user"/>
            </prepare>

            <configuration>
                <property>
                    <name>mapred.job.queue.name</name>
                    <value>${queueName}</value>
                </property>
            </configuration>
            <command>import --connect jdbc:mysql://localhost/clickstream --table user --target-dir ${examplesRootDir}/input-data/user -m 1</command>
        </sqoop>
        <ok to="joining"/>
        <error to="fail"/>
    </action>

    <action name="pig-node">
        <pig>
            <job-tracker>${jobTracker}</job-tracker>
            <name-node>${nameNode}</name-node>
            <prepare>
                <delete path="${nameNode}${examplesRootDir}/intermediate"/>
            </prepare>
            <configuration>
                <property>
                    <name>mapred.job.queue.name</name>
                    <value>${queueName}</value>
                </property>
                <property>
                    <name>mapred.compress.map.output</name>
                    <value>true</value>
                </property>
            </configuration>
            <script>filter.pig</script>
            <param>INPUT=${examplesRootDir}/input-data/clickstream</param>
            <param>OUTPUT=${examplesRootDir}/intermediate</param>
        </pig>
        <ok to="joining"/>
        <error to="fail"/>
    </action>

    <join name="joining" to="hive-node"/>

    <action name="hive-node">
        <hive xmlns="uri:oozie:hive-action:0.2">
            <job-tracker>${jobTracker}</job-tracker>
            <name-node>${nameNode}</name-node>
            <prepare>
                <delete path="${nameNode}/${examplesRootDir}/finaloutput"/>
            </prepare>
            <configuration>
                <property>
                    <name>mapred.job.queue.name</name>
                    <value>${queueName}</value>
                </property>
            </configuration>
            <script>script.sql</script>
            <param>CLICKSTREAM=${examplesRootDir}/intermediate/</param>
            <param>USER=${examplesRootDir}/input-data/user/</param>
            <param>OUTPUT=${examplesRootDir}/finaloutput</param>
        </hive>
        <ok to="end"/>
        <error to="fail"/>
    </action>

    <kill name="fail">
        <message>Sqoop failed, error message[${wf:errorMessage(wf:lastErrorNode())}]</message>
    </kill>
    <end name="end"/>
</workflow-app>
- Create the job.properties file in HDFS (oozie-clickstream-examples/apps/cs/job.properties).
nameNode=hdfs://localhost:9000
jobTracker=localhost:9001
queueName=default

examplesRoot=oozie-clickstream-examples
examplesRootDir=/user/${user.name}/${examplesRoot}

oozie.use.system.libpath=true
oozie.wf.application.path=${nameNode}/user/${user.name}/${examplesRoot}/apps/cs
- Create the Hive script file in HDFS (oozie-clickstream-examples/apps/cs/script.sql). The below mentioned query will find the top 3 url's visited by users whose age is less than 16.
DROP TABLE clickstream;
CREATE EXTERNAL TABLE clickstream (userid INT, url STRING) ROW FORMAT DELIMITED FIELDS TERMINATED BY '\t' LOCATION '${CLICKSTREAM}';

DROP TABLE user;
CREATE EXTERNAL TABLE user (user_id INT, name STRING, age INT, country STRING, gender STRING) ROW FORMAT DELIMITED FIELDS TERMINATED BY ',' LOCATION '${USER}';

INSERT OVERWRITE DIRECTORY '${OUTPUT}' SELECT url,count(url) c FROM user u JOIN clickstream c ON (u.user_id=c.userid) where u.age<16 group by url order by c DESC LIMIT 3;
- Create the Pig script file in HDFS (oozie-clickstream-examples/apps/cs/filter.pig).
clickstream = load '$INPUT' using PigStorage(',') as (userid:int, url:chararray);
SPLIT clickstream INTO good_records IF userid is not null,  bad_records IF userid is null;
STORE good_records into '$OUTPUT';
- Execute the Oozie workflow as below. Note that the `job.properties` file should be present in the local file system and not in HDFS.
bin/oozie job -oozie http://localhost:11000/oozie -config /home/vm4learning/Code/oozie-clickstream-examples/apps/cs/job.properties -run
- Initially the job will be in the `RUNNING` state and finally will reach the `SUCCEEDED` state. The progress of the work flow can be monitored from Oozie console at http://localhost:11000/oozie/.

- The output should appear as below in the `oozie-clickstream-examples/finaloutput/000000_0` file in HDFS.
www.businessweek.com 2
www.eenadu.net 2
www.stackoverflow.com 2
Here are some final thoughts on Oozie.

- It's better to test the individual actions like Hive, Pig and Sqoop independent of Ooize and later integrate them in the Oozie work flow.

- The Oozie error messages very cryptic and the MapReduce log files need to be looked to figure out the actual error.

- The Web UI which comes with Oozie is very rudimentary and clumsy, need to look into some of the alternatives.

- The XML for creating the work flows is very verbose and is very error prone. Any UI for creating workflows for Oozie would be very helpful.

Will look into the alternatives for some of the above problems mentioned in a future blog entry.

Tuesday, October 22, 2013

Integrating R and Hadoop using rmr2/rhdfs packages from Revolution Analytics

As mentioned in the earlier post Hadoop MR programs can be developed in non Java languages using the Hadoop streaming.

R is a language which has lot of libraries for statistics, so data processing involving a lot of statistics can be easily done in R. R can be integrated with Hadoop by writing R programs which read from the STDIO, do some processing and then writing to the results to the STDIO. An easier approach is to use some of the libraries like RHIPE and rmr2/rhdfs from Revolution Analytics.

With the assumption that R has been installed and integrated with Hadoop as mentioned in the previous blog, this blog will look into how to integrate R with Hadoop using 3rd party packages like rmr2/rhdfs from Revolution Analytics. As mentioned here it is much more easier to write R programs using rmr2/rhdfs than without.

Here are the instructions on how to install rmr2/rhdfs and then run write/run MR programs using those packages.

- Install the dependencies for rmr2/rhdfs. Note that the dependencies have to be installed in the system folder and not in a custom folder. This can be done by running R as sudo and then installing the below mentioned packages. Check this query on StackOverflow on why.
install.packages(c("codetools", "R", "Rcpp", "RJSONIO", "bitops", "digest", "functional", "stringr", "plyr", "reshape2", "rJava"))
- Download the latest rmr2*tar.gz and rhdfs*tar.gz from here.

- Install rmr2.
sudo R CMD INSTALL rmr rmr2_2.3.0.tar.gz
- Install rhdfs.
sudo JAVA_HOME=/usr/lib/jvm/jdk1.6.0_45 R CMD javareconf
sudo HADOOP_CMD=/home/vm4learning/Installations/hadoop-1.2.1/bin/hadoop R CMD INSTALL rhdfs rhbase_1.2.0.tar.gz
- Execute the below commands from the R shell to kick off the MR 
Sys.setenv(HADOOP_HOME="/home/vm4learning/Installations/hadoop-1.2.1")
Sys.setenv(HADOOP_CMD="/home/vm4learning/Installations/hadoop-1.2.1/bin/hadoop")

library(rmr2)
library(rhdfs)

ints = to.dfs(1:100)
calc = mapreduce(input = ints, map = function(k, v) cbind(v, 2*v))

from.dfs(calc)
- Verify the output of the MR job to make sure that Hadoop and rmr2/rhdfs have been integrated properly.
$val
         v    
  [1,]   1   2
  [2,]   2   4
  ............
  ............

In the upcoming blogs, we will see how to write complex MR programs using rmr2/rhdfs.

Wednesday, October 16, 2013

Finding interested Hadoop users in the vicinity using twitteR

In an earlier blog article, we looked at how to get the Tweets using Flume, put them into HDFS and then analyze it using Hive. Now, we will try to get some more interesting data from Twitter using R.

It's nice to know others with the same interests as we have within our vicinity. One way is to find out who Tweeted about a certain topic of interest in the vicinity. Twitter provides location feature which attaches the location information as meta along with the Tweets. This feature is off by default in the Twitter settings and here is how to opt in.

R provides a nice library (twitteR) to extract the Tweets and one of the option is to specify the geo location. Here is the API documentation for the twitteR package. With the assumption that R has been installed as mentioned in the earlier blog, now is the time to install the twitteR package and get get Tweets.

Here are the steps.

- First `libcurl4-openssl-dev` package has to be installed.
sudo apt-get install libcurl4-openssl-dev
- Create an account with twitter.com and create a new application here and get the `Consumer Key` and the `Consumer Secret`.
- Install the twitteR package from the R shell along with the dependencies.
install.packages("twitteR", dependencies=TRUE)
- Load the twitteR library in the R shell and call the getTwitterOAuth function with the `Consumer Key` and the `Consumer Secret` got from the earlier step.
library("twitteR")
getTwitterOAuth("Consumer Key", "Consumer Secret")

- The previous step will provide a URL, copy the URL to the browser and a PIN will be provided.
 
- Copy the PIN and paste it back in the console and now we are all set to get Tweets using the twitteR package.

- Goto the Google Maps and find your current location. In the URL, the latitude/longitude will be there.
https://www.google.com/maps/preview#!q=60532&data=!4m15!2m14!1m13!1s0x880e5123b7fe36d9%3A0xbedcc6bcaa223107!3m8!1m3!1d22176155!2d-95.677068!3d37.0625!3m2!1i1317!2i653!4f13.1!4m2!3d41.794402!4d-88.0803051

- Call the searchTwitter API with the above latitude/longitude and topic of interest to get the Tweets to the console.
searchTwitter('hadoop', geocode='41.794402,-88.0803051,5mi',  n=5000, retryOnRateLimit=1)
If you are providing some sort of service, you can now easily find others who are interested in your service in your vicinity.

1) Here is an interesting article on doing Facebook analysis using R.
 

Monday, October 14, 2013

MapReduce programming in R using Hadoop Streaming

Hadoop supports non Java languages for writing MapReduce programs with the streaming feature. Any language which runs on Linux and can read/write from the STDIO can be used to write MR programs. With Microsoft HDInsight, it should be possible to even use .NET languages against Hadoop.

So, often I get the query `what is the best language for writing programs in MR model?`. It all depends on the requirements. If the requirements are about statistics then R is one of the choice, if it is NLP then Python is one of the choice. Based on the library support for the requirements, the appropriate language has to be choose.

In this blog we will install and configure R on Ubuntu to execute a simple MR program (word count) in R. This is with the assumption that Hadoop is already installed and works properly.

BTW, R can be integrated with Hadoop in multiple ways. One way is to use the R without any additional packages. In this case, R would be reading from STDIO, do some processing and then write to the STDIO. The second way is to use some packages like RHIPE, rmr2 and others. This blog is about integrating R with Hadoop without using any 3rd party libraries (the first approach).

Just as a note, I had been using Ubuntu 12.04, because it's latest LTS release from Canonical as of this writing and is supported till April, 2017. Canonical follows a 6 months release and every fourth release is LTS which are supported for 5 years, while the rest of the releases supported for 9 months. So, the next LTS release will be in April, 2014. This is one of the reason why I am stuck (and also feel good) with Ubuntu 12.04 for now.

The main advantage of sticking with an old release of Ubuntu (which is still supported) is that it becomes more and more stable over time and the main disadvantage is that the packages are outdated. Canonical provides major upgrades to different softwares only across different Ubuntu releases. So, Ubuntu 12.04 has an old version of R (2.14.1) which doesn't work with some of the Hadoop packages from Revolution Analytics and others, so the first step is to upgrade R and not use the one which comes with Ubuntu.

So, here are the steps (Note that the paths should be updated accordingly and also some of the commands would require administrative privileges)

- Pick a closest CRAN mirror from here and add the below lines to the `/etc/apt/sources.list` file to add a new repository. The same thing can be also done using the Synaptic Package Manager, the instructions for the same are here.
deb http://cran.ma.imperial.ac.uk/bin/linux/ubuntu precise/

deb-src http://cran.ma.imperial.ac.uk/bin/linux/ubuntu precise/
- Update the package index using the below command
sudo apt-get update
- Now is the time to install R using the apt-get as below. This command will install R with all it's dependencies.
sudo apt-get install r-base
- Verify that R is installed properly by running a simple program in the R shell.
> ints = 1:100
> doubleInts = sapply(ints, function(x) 2*x)
> head(doubleInts)

[1]  2  4  6  8 10 12

- Now create a mapper.R file using the below code
#! /usr/bin/env Rscript
# mapper.R - Wordcount program in R
# script for Mapper (R-Hadoop integration)

trimWhiteSpace <- function(line) gsub("(^ +)|( +$)", "", line)
splitIntoWords <- function(line) unlist(strsplit(line, "[[:space:]]+"))

con <- file("stdin", open = "r")

while (length(line <- readLines(con, n = 1, warn = FALSE)) > 0) {
    line <- trimWhiteSpace(line)
    words <- splitIntoWords(line)

    for (w in words)
        cat(w, "\t1\n", sep="")
}
close(con)

- Now create a reducer.R file using the below code
#! /usr/bin/env Rscript
# reducer.R - Wordcount program in R
# script for Reducer (R-Hadoop integration)

trimWhiteSpace <- function(line) gsub("(^ +)|( +$)", "", line)

splitLine <- function(line) {
    val <- unlist(strsplit(line, "\t"))
    list(word = val[1], count = as.integer(val[2]))
}

env <- new.env(hash = TRUE)
con <- file("stdin", open = "r")

while (length(line <- readLines(con, n = 1, warn = FALSE)) > 0) {
    line <- trimWhiteSpace(line)
    split <- splitLine(line)
    word <- split$word
    count <- split$count

    if (exists(word, envir = env, inherits = FALSE)) {
        oldcount <- get(word, envir = env)
        assign(word, oldcount + count, envir = env)
    }
    else assign(word, count, envir = env)
}
close(con)

for (w in ls(env, all = TRUE))
    cat(w, "\t", get(w, envir = env), "\n", sep = "")

- Streaming code works independent of Hadoop, because the scripts read/write from STDIO and have no Hadoop bindings. So, the scripts can be tested independent of Hadoop as below.
vm4learning@vm4learning:~/Code/Streaming$ echo "foo foo quux labs foo bar quux" | Rscript mapper.R  | sort -k1,1 | Rscript reducer.R
bar    1
foo    3
labs    1
quux    2
- Create a simple input file and then upload the data into HDFS before running the MR job.
bin/hadoop fs -put /home/vm4learning/Desktop/input.txt input3/input.txt

- Run the MR job as below
bin/hadoop jar contrib/streaming/hadoop-streaming-1.2.1.jar -file  /home/vm4learning/Code/Streaming/mapper.R  -mapper /home/vm4learning/Code/Streaming/mapper.R -file /home/vm4learning/Code/Streaming/reducer.R  -reducer /home/vm4learning/Code/Streaming/reducer.R -input input3/ -output output3/

 - The output of the MR job written should be there in the output3/ folder in HDFS.

In the upcoming blogs, we will see how to use 3rd party libraries like the ones from Revolution Analytics to write much more simpler MR programs in R.

1) Here is a blog from HortonWorks on the same.

Monday, October 7, 2013

Installation and configuration of Apache Oozie

Many a times there will be a requirement of running a group of dependent data processing jobs. Also, we might want to run some of them at regular intervals of time. This is where Apache Oozie fits the picture. Here are some nice articles (1, 2, 3, 4) on how to use Oozie.

Apache Oozie has three components which are a work flow engine to run a DAG of actions, a coordinator (similar to a cron job or a scheduler) and a bundle to batch a group of coordinators. Azkaban from LinkedIn is similar to Oozie, here are the articles (1, 2) comparing both of them.

Installing and configuring Oozie is not straight forward, not only because of the documentation, but also because the release includes only the source code and not the binaries. The code has to be got, the dependencies installed and then the binaries built. It's a bit tedious process, so this blog with an assumption that Hadoop has been already installed and configured. Here is the official documentation on how to build and install Oozie.

So, here are the steps to install and configure

- Make sure the requirements (Unix box (tested on Mac OS X and Linux), Java JDK 1.6+, Maven 3.0.1+, Hadoop 0.20.2+, Pig 0.7+) to build are met.

- Download a release containing the code from Apache Oozie site and extract the source code.
- Execute the below command to start the build. During the build process, the jars have to be downloaded, so it might take some time based on the network bandwidth. Make sure that there are no errors in the build process.
bin/mkdistro.sh -DskipTests
- Once the build is complete the binary file oozie-4.0.0.tar.gz should be present in the folder where Oozie code was extracted. Extract the tar.gz file, this will create a folder called oozie-4.0.0.

- Create a libext/ folder and copy the commons-configuration-*.jar, ext-2.2.zip,  hadoop-client-*.jar and  hadoop-core-*.jar files. The hadoop jars need to be copied from the Hadoop installation folder.

When Oozie is started, the below exception is seen in the catalina.out log file. This is the reason for including the commons-configuration-*.jar file in libext/ folder.
java.lang.NoClassDefFoundError: org/apache/commons/configuration/Configuration
        at org.apache.hadoop.metrics2.lib.DefaultMetricsSystem.<init>(DefaultMetricsSystem.java:37)
        at org.apache.hadoop.metrics2.lib.DefaultMetricsSystem.<clinit>(DefaultMetricsSystem.java:34)
        at org.apache.hadoop.security.UgiInstrumentation.create(UgiInstrumentation.java:51)
        at org.apache.hadoop.security.UserGroupInformation.initialize(UserGroupInformation.java:217) 
- Prepare a war file using the below command. oozie.war file should be there in the oozie-4.0.0/oozie-server/webapps folder.
bin/oozie-setup.sh prepare-war
- Create Oozie related schema using the below command
bin/ooziedb.sh create -sqlfile oozie.sql -run

- Now is the time to start the Oozie Service which runs in Tomcat.
bin/oozied.sh start

- Check the Oozie log file logs/oozie.log to ensure Oozie started properly. And, run the below command to check the status of Oozie or instead go to the Oozie console at http://localhost:11000/oozie
bin/oozie admin -oozie http://localhost:11000/oozie -status

- Now, the Oozie client has to be installed by extracting the oozie-client-4.0.0.tar.gz. This will create a folder called oozie-client-4.0.0.

With the Oozie service running and the Oozie client installed, now is the time to run some simple work flows in Oozie to make sure Oozie works fine. Oozie comes with a bunch of examples in the oozie-examples.tar.gz. Here are the steps for the same.

- Extract the oozie-examples.tar.gz and change the port number on which the NameNode listens (Oozie default is 8020 and Hadoop default is 9000) in all the job.properties files. Similarly, for the JobTracker also the port number has to be modified (Oozie default is 8021 and Hadoop default is 9001).

- In the Hadoop installation, add the below to the conf/core-site.xml file. Check the Oozie documentation for more information on what these parameters mean
     <property>
          <name>hadoop.proxyuser.training.hosts</name>
          <value>localhost</value>
     </property>
     <property>
          <name>hadoop.proxyuser.training.groups</name>es
          <value>training</value>
     </property>
- Make sure that HDFS and MR are started and running properly.

- Copy the examples folder in HDFS using the below command
bin/hadoop fs -put /home/training/tmp/examples/ examples/

- Now run the Oozie example as
oozie job -oozie http://localhost:11000/oozie -config /home/training/tmp/examples/apps/map-reduce/job.properties -run
- The status of the job can be got using the below command
oozie job -oozie http://localhost:11000/oozie -info 14-20090525161321-oozie-tucu

In the upcoming blogs, we will see how to write some simple work flows and schedule tasks in Oozie.

Friday, October 4, 2013

Alternative to Google Reader Search

For a variety of reasons RSS aggregators didn't hit the main stream even with those who work in the IT field. I had been using RSS aggregators for quite some time to keep myself updated with the latest in the Technology.

Now that the Google Reader has been sunset, a lot of alternate RSS aggregators have been popping up. The demise of once dominant Google Reader really opened market for others. I tried a couple of RSS aggregators and finally settled with Feedly.
Feedly is a nice RSS aggregator which has almost all the features of the Google Reader. Feedly recently even opened the API for other applications to be built upon the Feedly platform. But, one of the features I really miss in Google Reader is searching through the subscribed feeds instead of the entire internet. Google Reader was really good at it, with an option for searching through a subset of feeds which came very handy.

Feedly didn't have initially have this feature, but later it had been introduced through Feedly Pro, which is a paid service. So, I was looking for some alternatives to the Google Reader search feature. Google Custom Search Engine (CSE) is an alternative for searching through a bunch of sites. Here is a CSE created using the below mentioned sites.
 
Below is the sequence of steps to move the feeds from Feedly to Google CSE. The problem with this approach it that Feedly and Google CSE are seperate data islands and any feed subscribed in Feedly needs to be included in Google CSE manually. The process is a bit cumbersome, but worth the effort.

- Export the feeds from Feedly to an OPML file. Here is how to do it.

- Run the below script to extract the feeds from the opml file. Note than some of the feeds will be extracted as `http://feedproxy.google.com/TechCrunch`which needs be modified into the actual site `http://techcrunch.com/`.
grep xmlUrl feedly.opml | perl -ne 'if(/xmlUrl=\"(.+?)"/){print "$1\n"}'
- Once the feeds have been extracted and modified, export them in Google CSE in bulk as mentioned here.

- Extract the Public URL to search through the feeds added in the earlier step.

Voila, here are the results from the custom search for the word Bitcoin.
Please let me know in the comments if there any better alternatives for solving this problem and I will update the blog accordingly.

Tuesday, October 1, 2013

Sqoop2 vs Sqoop

Apache Sqoop uses a client model where the user needs to the install Sqoop along with connectors/drivers on the client. Sqoop2 (the next version of Sqoop) uses a service based model, where the connectors/drivers are installed on the Sqoop2 server. Also, all the configurations needs to be done on the Sqoop2 server. Note that this blog entry refers to Sqoop 1x (client based model) as Sqoop and Sqoop 2x (service based model) as Sqoop2.

From an MR perspective another difference is that Sqoop submits a Map only job, while Sqoop2 submits a MapReduce job where the Mappers would be transporting the data from the source, while the Reducers would be transforming the data according to the source specified. This provides a clean abstraction. In Sqoop, both the transportation and the transformations were provided by Mappers only.

Another major difference in Sqoop2 is from a security perspective. The administrator would be setting up the connections to the source and the targets, while the operator user uses the already established connections, so the operator user need not know the details about the connections. And operators will be given access to only some of the connectors as required.

Along with the continuation of the CLI, Web UI can also be used with Sqoop2. The CLI and the Web UI consume the REST services provided by the Sqoop Server. One thing to note is that the Web UI is part of Hue (HUE-1214) and not part of the ASF. The Sqoop2 REST interface also makes it easy to integrate with other frameworks like Oozie to define a work flow involving Sqoop2.
Here is a video on why Sqoop2. The voice is a bit not clear. For those who are more into reading, here are the articles (1, 2) for the same.

Also, here is the documentation for installing and using Sqoop2.  I tried installing it and as with any other framework in the initial stages, Sqoop2 is still half cooked and a lot more to be improved/developed from a usability/documentation perspective. Although the features of Sqoop2 are interesting, until Sqoop2 becomes more usable/stable we are left with Sqoop to get the data from RDBMs to Hadoop.

Apache Tez - Beyond Hadoop (MR)

Apache Pig and Hive are higher level abstracts on top of MR (MapReduce). PigLatin scripts of Pig and HiveQL queries of Hive are converted into a DAG of MR jobs, with the first MR job (5) reading from the input the last MR job (2) writing to the output. One of the problem with this approach is that the temporary data between the MR jobs (as in the case of 11 and 9) is written to HDFS (by 11) and read from HDFS (by 9) which leads to inefficiency. Not only this, multiple MR jobs will also lead to initialization over head.
With the ClickStream analysis mentioned in the blog earlier, to find out the `top 3 urls visited by users whose age is less than 16` Hive results in a DAG of 3 MR jobs, while Pig results in a DAG of 5 MR jobs.

Apache Tez (Tez means Speed in Hindi) is a generalized data processing paradigm which tries to address some of the challenges mentioned above. Using Tez along with Hive/Pig, a single HiveQL or PigLatin will be converted into a single Tez Job and not as a DAG of MR jobs as is happening now. In Tez, data processing is represented as a graph with the vertices in the graph representing processing of data and edges representing movement of data between the processing.

With Tez the output of a MR job can be directly streamed to the next MR job  without writing to HDFS. If there are is any failure, the tasks from the last checkpoint will be executed. In the above DAG, (5) will read the input from the disk and (2) will write the output to the disk. The data between the remaining vertices can happen in-memory or can be streamed over the network or can be written to the disk for the sake of checkpointing.

According to the Tez developers in the below video, Tez is for frameworks like Pig, Hive and not for the end users to directly code to Tez.
HortonWorks had been aggressively promoting Tez as a replacement to Hadoop runtime and is also publishing a series of articles on the same (1, 2, 3, 4). A DAG of MR jobs would also run efficiently on a Tez runtime than on a Hadoop runtime.

Work is in progress to run Pig and Hive on the Tez runtime. Here are the JIRAs (Pig and Hive) for the same. Need to wait and see how far it is accepted by the community. In the future we should be able to run Pig and Hive on Hadoop and Tez runtime by just switching a flag in the configuration files.

Tez is a part of a bigger initiative Stinger, which I will cover in another blog entry.